
A few weeks ago I published a tutorial on how to get started with the Google Coral USB Accelerator. That tutorial was meant to help you configure your device and run your first demo script.
Today we are going to take it a step further and learn how to utilize the Google Coral in your own custom Python scripts!
Inside today’s tutorial you will learn:
- Image classification with the Coral USB Accelerator
- Image classification in video with the Google Coral Accelerator
- Object detection with the Google Coral
- Object detection in video with the Coral USB Accelerator
After reading this guide, you will have a strong understanding of how to utilize the Google Coral for image classification and object detection in your own applications.
To learn how to perform image classification and object detection with the Google Coral USB Accelerator, just keep reading!
Looking for the source code to this post?
Jump right to the downloads section.
Object detection and image classification with Google Coral USB Accelerator
For this guide I will be making the following assumptions:
- You already own a Google Coral USB Accelerator.
- You have followed my previous tutorial on how to install and configure Google Coral.
If you haven’t followed by install guide, please refer to it before continuing. Finally, I’ll note that I’m connecting my Google Coral USB Accelerator to my Raspberry Pi to gather results — I’m doing this for two reasons:
- I’m currently writing a book on using the Raspberry Pi for Computer Vision which will also cover the Google Coral.
- I cover the Raspberry Pi quite often on the PyImageSearch blog and I know many readers are interested in how they can leverage it for computer vision.
If you don’t have a Raspberry Pi but still want to use your Google Coral USB Accelerator, that’s okay, but make sure you are running a Debian-based OS.
Again, refer to my previous Google Coral getting started guide for more information.
Project structure
Let’s review the project included in today’s “Downloads”:
$ tree --dirsfirst
.
├── inception_v4
│   ├── imagenet_labels.txt
│   └── inception_v4_299_quant_edgetpu.tflite
├── mobilenet_ssd_v2
│   ├── coco_labels.txt
│   └── mobilenet_ssd_v2_coco_quant_postprocess_edgetpu.tflite
├── mobilenet_v2
│   ├── imagenet_labels.txt
│   └── mobilenet_v2_1.0_224_quant_edgetpu.tflite
├── classify_image.py
├── classify_video.py
├── detect_image.py
├── detect_video.py
├── janie.jpg
└── thanos.jpg

3 directories, 12 files
Today we will be reviewing four Python scripts:
classify_image.py
– Classifies a single image with the Google Coral.classify_video.py
– Real-time classification of every frame from a webcam video stream using the Coral.detect_image.py
– Performs object detection using Google’s Coral deep learning coprocessor.detect_video.py
– Real-time object detection using Google Coral and a webcam.
We have three pre-trained TensorFlow Lite models + labels available in the “Downloads”:
- Classification (trained on ImageNet):
inception_v4/
– The Inception V4 classifier.mobilenet_v2/
– MobileNet V2 classifier.
- Object detection (trained on COCO):
mobilenet_ssd_v2/
– MobileNet V2 Single Shot Detector (SSD).
If you are curious about how to train your own classification and object detection models, be sure to refer to Deep Learning for Computer Vision with Python.
For both
classify_image.pyand
detect_image.py, I’ve provided two testing images in the “Downloads”:
janie.jpg
– My adorable beagle.thanos.jpg
– Character from Avengers: End Game.
For the
classify_video.pyand
detect_video.pyscripts, we’ll be capturing frames directly from a camera connected to the Raspberry Pi. You can use one of the following with today’s example scripts:
- PiCamera V2 – The official Raspberry Pi Foundation camera.
- USB Webcam – Any USB camera that supports V4L will work, such as a Logitech branded webcam.
Image classification with the Coral USB Accelerator
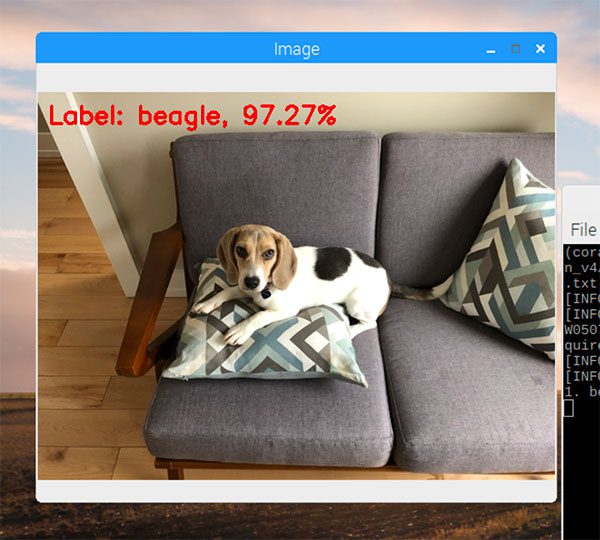
Figure 1: Image classification using Python with the Google Coral TPU USB Accelerator and the Raspberry Pi.
Let’s get started with image classification on the Google Coral!
Open up the
classify_image.pyfile and insert the following code:
# import the necessary packages
from edgetpu.classification.engine import ClassificationEngine
from PIL import Image
import argparse
import imutils
import time
import cv2

# construct the argument parser and parse the arguments
ap = argparse.ArgumentParser()
ap.add_argument("-m", "--model", required=True,
	help="path to TensorFlow Lite classification model")
ap.add_argument("-l", "--labels", required=True,
	help="path to labels file")
ap.add_argument("-i", "--image", required=True,
	help="path to input image")
args = vars(ap.parse_args())
We start of by importing packages. Most notably, we are importing
ClassificationEnginefrom
edgetpuon Line 2.
From there we’ll parse three command line arguments via Lines 10-17:
--model
: The path to our TensorFlow Lite classifier.--labels
: Class labels file path associated with our model.--image
: Our input image path.
Using these three command line arguments, our script will be able to handle compatible pre-trained models and any image you throw at it all from the command line. Command line arguments are one of the number one problems people e-mail me about, so be sure to review my tutorial on argparse and command line arguments if you need a refresher.
Let’s go ahead and load the
labels:
# initialize the labels dictionary
print("[INFO] parsing class labels...")
labels = {}

# loop over the class labels file
for row in open(args["labels"]):
	# unpack the row and update the labels dictionary
	(classID, label) = row.strip().split(" ", maxsplit=1)
	labels[int(classID)] = label.strip()
Lines 21-27 facilitate loading class
labelsfrom a text file into a Python dictionary. Later on, the Coral API will return the predicted
classID(an integer). We can then take that integer class label and lookup the associated
labelvalue in this dictionary.
Moving on, now let’s load our classification
modelwith the
edgetpuAPI:
# load the Google Coral classification model
print("[INFO] loading Coral model...")
model = ClassificationEngine(args["model"])
Our pre-trained TensorFlow Lite classification
modelis instantiated via the
ClassificationEngineclass (Line 31) where we pass in the path to our model via command line argument.
Let’s go ahead and load + preprocess our
image:
# load the input image
image = cv2.imread(args["image"])
image = imutils.resize(image, width=500)
orig = image.copy()

# prepare the image for classification by converting (1) it from BGR
# to RGB channel ordering and then (2) from a NumPy array to PIL
# image format
image = cv2.cvtColor(image, cv2.COLOR_BGR2RGB)
image = Image.fromarray(image)
Our
imageis loaded (Line 34) and then preprocessed (Lines 35-42).
Take note that we made an original
copyof the image — we’ll be annotating this copy of the image with the output predictions later in the script.
How easy is it to perform classification inference on an image with the Google Coral Python API?
Let’s find out now:
# make predictions on the input image
print("[INFO] making predictions...")
start = time.time()
results = model.ClassifyWithImage(image, top_k=5)
end = time.time()
print("[INFO] classification took {:.4f} seconds...".format(
	end - start))
On Line 47, we make classification predictions on the input
imageusing the
ClassifyWithImagefunction (a super easy one-liner function call). I really like how the
edgetpuAPI allows us to specify that we only want the top results with the
top_kparameter.
Timestamps are sandwiched around this classification line and the elapse time is then printed via Lines 49 and 50.
From here we’ll process the
results:
# loop over the results
for (i, (classID, score)) in enumerate(results):
	# check to see if this is the top result, and if so, draw the
	# label on the image
	if i == 0:
		text = "Label: {}, {:.2f}%".format(labels[classID],
			score * 100)
		cv2.putText(orig, text, (10, 30), cv2.FONT_HERSHEY_SIMPLEX,
			0.8, (0, 0, 255), 2)

	# display the classification result to the terminal
	print("{}. {}: {:.2f}%".format(i + 1, labels[classID],
		score * 100))

# show the output image
cv2.imshow("Image", orig)
cv2.waitKey(0)
Looping over the
results(Line 53) we first find the top result and annotate the image with the label and percentage score (Lines 56-60).
For good measure, we’ll also print the other results and scores (but only in our terminal) via Lines 63 and 64.
Finally, the annotated original (OpenCV format) image is displayed to the screen (Lines 67 and 68).
That was straightforward. Let’s put our classification script to the test!
To see image classification in action with the Google Coral, make sure you use the “Downloads” section of this guide to download the code + pre-trained models — from there, execute the following command:
$ python classify_image.py --model inception_v4/inception_v4_299_quant_edgetpu.tflite --labels inception_v4/imagenet_labels.txt --image janie.jpg
[INFO] parsing class labels...
[INFO] loading Coral model...
W0507 08:04:36.445022    5885 package_registry.cc:65] Minimum runtime version required by package (5) is lower than expected (10).
[INFO] making predictions...
[INFO] classification took 1.2446 seconds...
1. beagle: 97.27%
The output of the image classification script can be seen in Figure 1 at the top of this section.
Here you can see that Janie, my dog, is correctly classified as “beagle”.
Image classification in video with the Google Coral Accelerator

Figure 2: Real-time classification with the Google Coral TPU USB Accelerator and Raspberry Pi using Python. OpenCV was used for preprocessing, annotation, and display.
In the previous section, we learned how to perform image classification to a single image — but what if we wanted to perform image classification to a video stream?
I’ll be showing you how to accomplish exactly that.
Open up a new file, name it
classify_video.pyand insert the following code:
# import the necessary packages
from edgetpu.classification.engine import ClassificationEngine
from imutils.video import VideoStream
from PIL import Image
import argparse
import imutils
import time
import cv2

# construct the argument parser and parse the arguments
ap = argparse.ArgumentParser()
ap.add_argument("-m", "--model", required=True,
	help="path to TensorFlow Lite classification model")
ap.add_argument("-l", "--labels", required=True,
	help="path to labels file")
args = vars(ap.parse_args())
There are two differences in our first code block for real-time classification compared to our previous single image classification script:
- On Line 2 we’ve added the
VideoStream
import for working with our webcam. - We no longer have a
--image
argument since by default we will be using our webcam.
Just as before, let’s load the
labelsand
model, but now we also need to instantiate our
VideoStream:
# initialize the labels dictionary
print("[INFO] parsing class labels...")
labels = {}

# loop over the class labels file
for row in open(args["labels"]):
	# unpack the row and update the labels dictionary
	(classID, label) = row.strip().split(" ", maxsplit=1)
	label = label.strip().split(",", maxsplit=1)[0]
	labels[int(classID)] = label

# load the Google Coral classification model
print("[INFO] loading Coral model...")
model = ClassificationEngine(args["model"])

# initialize the video stream and allow the camera sensor to warmup
print("[INFO] starting video stream...")
vs = VideoStream(src=0).start()
#vs = VideoStream(usePiCamera=False).start()
time.sleep(2.0)
Lines 19-31 are identical to our previous script where we load our class labels and store them in a dictionary.
On Line 35 we instantiate our
VideoStreamobject so that we can read frames in our webcam (covered in the next code block). A
2.0second sleep is added so our camera has time to warm up (Line 37).
Note: By default, this script will use a USB webcam. If you would like to use a Raspberry Pi camera module, simply comment out Line 35 and uncomment Line 36.
Let’s begin our loop:
# loop over the frames from the video stream
while True:
	# grab the frame from the threaded video stream and resize it
	# to have a maximum width of 500 pixels
	frame = vs.read()
	frame = imutils.resize(frame, width=500)
	orig = frame.copy()

	# prepare the frame for classification by converting (1) it from
	# BGR to RGB channel ordering and then (2) from a NumPy array to
	# PIL image format
	frame = cv2.cvtColor(frame, cv2.COLOR_BGR2RGB)
	frame = Image.fromarray(frame)
We start looping on Line 40.
Line 43 grabs a
framefrom the threaded video stream.
We go ahead and preprocess it exactly as we did in the previous script (Lines 44-51).
With the
framein the correct PIL format, now we can make predictions and draw our annotations:
# make predictions on the input frame
	start = time.time()
	results = model.ClassifyWithImage(frame, top_k=1)
	end = time.time()

	# ensure at least one result was found
	if len(results) > 0:
		# draw the predicted class label, probability, and inference
		# time on the output frame
		(classID, score) = results[0]
		text = "{}: {:.2f}% ({:.4f} sec)".format(labels[classID],
			score * 100, end - start)
		cv2.putText(orig, text, (10, 30), cv2.FONT_HERSHEY_SIMPLEX,
			0.5, (0, 0, 255), 2)

	# show the output frame and wait for a key press
	cv2.imshow("Frame", orig)
	key = cv2.waitKey(1) & 0xFF

	# if the `q` key was pressed, break from the loop
	if key == ord("q"):
		break

# do a bit of cleanup
cv2.destroyAllWindows()
vs.stop()
Just as before, Line 55 performs inference.
From there, the top result is extracted and the classification label +
scoreis annotated on the
origframe (Lines 59-66).
The frame is displayed on the screen (Line 69).
If the
"q"key is pressed, we’ll break from the loop and clean up (Lines 70-78).
Let’s give image classification in video streams with the Google Coral a try!
Make sure you use the “Downloads” section of this guide to download the code + pre-trained models — from there, execute the following command:
$ python classify_video.py --model mobilenet_v2/mobilenet_v2_1.0_224_quant_edgetpu.tflite --labels mobilenet_v2/imagenet_labels.txt
[INFO] parsing class labels...
[INFO] loading Coral model...
W0507 07:52:49.077803    2830 package_registry.cc:65] Minimum runtime version required by package (5) is lower than expected (10).
[INFO] starting video stream...
An example of real-time image classification can be seen above in Figure 2.
Using the Google Coral USB Accelerator, the MobileNet classifier (trained on ImageNet) is fully capable of running in real-time on the Raspberry Pi.
Object detection with the Google Coral
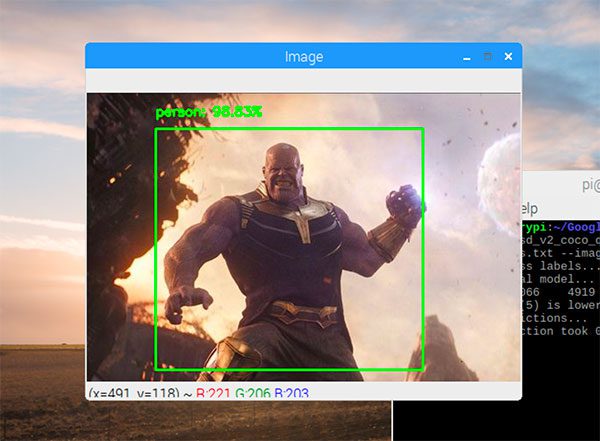
Figure 3: Deep learning-based object detection of an image using Python, Google Coral, and the Raspberry Pi.
We’ve already learned how to apply image classification with the Google Coral — but what if we not only wanted to classify an object in an image but also detect where in the image the object is?
Such a task is called object detection, a technique I’ve covered quite a few times on the PyImageSearch blog (refer to this deep learning-based object detection guide if you are new to the concept).
Open up the
detect_image.pyfile and let’s get coding:
# import the necessary packages
from edgetpu.detection.engine import DetectionEngine
from PIL import Image
import argparse
import imutils
import time
import cv2

# construct the argument parser and parse the arguments
ap = argparse.ArgumentParser()
ap.add_argument("-m", "--model", required=True,
	help="path to TensorFlow Lite object detection model")
ap.add_argument("-l", "--labels", required=True,
	help="path to labels file")
ap.add_argument("-i", "--image", required=True,
	help="path to input image")
ap.add_argument("-c", "--confidence", type=float, default=0.3,
	help="minimum probability to filter weak detections")
args = vars(ap.parse_args())
Our packages are imported on Lines 2-7. For Google Coral object detection with Python, we use the
DetectionEnginefrom the
edgetpuAPI.
Our command line arguments are similar to the
classify_image.pyscript with one exception — we’re also going to supply a
--confidenceargument representing the minimum probability to filter out weak detections (Lines 17 and 18).
Now we’ll load the labels in the same manner as in our classification scripts:
# initialize the labels dictionary
print("[INFO] parsing class labels...")
labels = {}

# loop over the class labels file
for row in open(args["labels"]):
	# unpack the row and update the labels dictionary
	(classID, label) = row.strip().split(maxsplit=1)
	labels[int(classID)] = label.strip()
And from there we’ll load our object detection
model:
# load the Google Coral object detection model
print("[INFO] loading Coral model...")
model = DetectionEngine(args["model"])
We can now load our input image and perform preprocessing:
# load the input image
image = cv2.imread(args["image"])
image = imutils.resize(image, width=500)
orig = image.copy()

# prepare the image for object detection by converting (1) it from
# BGR to RGB channel ordering and then (2) from a NumPy array to PIL
# image format
image = cv2.cvtColor(image, cv2.COLOR_BGR2RGB)
image = Image.fromarray(image)
After preprocessing, it is time to perform object detection inference:
# make predictions on the input image
print("[INFO] making predictions...")
start = time.time()
results = model.DetectWithImage(image, threshold=args["confidence"],
	keep_aspect_ratio=True, relative_coord=False)
end = time.time()
print("[INFO] object detection took {:.4f} seconds...".format(
	end - start))
Lines 49 and 50 use Google Coral’s object detection API to make predictions.
Being able to pass our confidence threshold (via the
thresholdparameter), is extremely convenient in this API. Honestly, I wish OpenCV’s DNN API would follow suit. It saves an if-statement later on as you can imagine.
Let’s process our
results:
# loop over the results
for r in results:
	# extract the bounding box and box and predicted class label
	box = r.bounding_box.flatten().astype("int")
	(startX, startY, endX, endY) = box
	label = labels[r.label_id]

	# draw the bounding box and label on the image
	cv2.rectangle(orig, (startX, startY), (endX, endY),
		(0, 255, 0), 2)
	y = startY - 15 if startY - 15 > 15 else startY + 15
	text = "{}: {:.2f}%".format(label, r.score * 100)
	cv2.putText(orig, text, (startX, y),
		cv2.FONT_HERSHEY_SIMPLEX, 0.5, (0, 255, 0), 2)

# show the output image
cv2.imshow("Image", orig)
cv2.waitKey(0)
Looping over the
results(Line 56), we first extract the bounding
boxcoordinates (Lines 58 and 59). Conveniently, the
boxis already scaled relative to our input image dimensions (from any behind the scenes resizing the API does to fit the image into the CNN).
From there we can easily extract the class
labelvia Line 60.
Next, we draw the bounding box rectangle (Lines 63 and 64) and draw the predicted object
texton the image (Lines 65-68).
Our
origimage (with object detection annotations) is then displayed via Lines 71 and 72.
Let’s put object detection with the Google Coral USB Accelerator to the test!
Use the “Downloads” section of this tutorial to download the source code + pre-trained models.
From there, open up a terminal and execute the following command:
$ python detect_image.py \
	--model mobilenet_ssd_v2/mobilenet_ssd_v2_coco_quant_postprocess_edgetpu.tflite \
	--labels mobilenet_ssd_v2/coco_labels.txt --image thanos.jpg
[INFO] parsing class labels...
[INFO] loading Coral model...
W0507 08:00:58.843066    4919 package_registry.cc:65] Minimum runtime version required by package (5) is lower than expected (10).
[INFO] making predictions...
[INFO] object detection took 0.2318 seconds...
Just for fun, I decided to apply object detection to a screen capture of Avengers: Endgame movie (don’t worry, there aren’t any spoilers!)
Here we can see that Thanos, a character from the film, is detected (Figure 3)…although I’m not sure he’s an actual “person” if you know what I mean.
Object detection in video with the Coral USB Accelerator
Figure 4: Real-time object detection with Google’s Coral USB deep learning coprocessor, the perfect companion for the Raspberry Pi.
Our final script will cover how to perform object detection in real-time video with the Google Coral.
Open up a new file, name it
detect_video.py, and insert the following code:
# import the necessary packages
from edgetpu.detection.engine import DetectionEngine
from imutils.video import VideoStream
from PIL import Image
import argparse
import imutils
import time
import cv2

# construct the argument parser and parse the arguments
ap = argparse.ArgumentParser()
ap.add_argument("-m", "--model", required=True,
	help="path to TensorFlow Lite object detection model")
ap.add_argument("-l", "--labels", required=True,
	help="path to labels file")
ap.add_argument("-c", "--confidence", type=float, default=0.3,
	help="minimum probability to filter weak detections")
args = vars(ap.parse_args())
To start, we import our required packages and parse our command line arguments (Lines 2-8) Again, we’re using
VideoStreamso we can access our webcam (since we’re performing object detection on webcam frames, we don’t have a
--imagecommand line argument).
Next, we’ll load our
labelsand instantiate both our
modeland video stream:
# initialize the labels dictionary
print("[INFO] parsing class labels...")
labels = {}

# loop over the class labels file
for row in open(args["labels"]):
	# unpack the row and update the labels dictionary
	(classID, label) = row.strip().split(maxsplit=1)
	labels[int(classID)] = label.strip()

# load the Google Coral object detection model
print("[INFO] loading Coral model...")
model = DetectionEngine(args["model"])

# initialize the video stream and allow the camera sensor to warmup
print("[INFO] starting video stream...")
vs = VideoStream(src=0).start()
#vs = VideoStream(usePiCamera=False).start()
time.sleep(2.0)
From there, we’ll loop over frames from the video stream:
# loop over the frames from the video stream
while True:
	# grab the frame from the threaded video stream and resize it
	# to have a maximum width of 500 pixels
	frame = vs.read()
	frame = imutils.resize(frame, width=500)
	orig = frame.copy()

	# prepare the frame for object detection by converting (1) it
	# from BGR to RGB channel ordering and then (2) from a NumPy
	# array to PIL image format
	frame = cv2.cvtColor(frame, cv2.COLOR_BGR2RGB)
	frame = Image.fromarray(frame)

	# make predictions on the input frame
	start = time.time()
	results = model.DetectWithImage(frame, threshold=args["confidence"],
		keep_aspect_ratio=True, relative_coord=False)
	end = time.time()
Our frame processing loop begins on Line 41. We proceed to:
- Grab and preprocess our frame (Lines 44-52).
- Perform object detection inference with the Google Coral (Lines 56 and 57).
From there we’ll process the results and display our output:
# loop over the results
	for r in results:
		# extract the bounding box and box and predicted class label
		box = r.bounding_box.flatten().astype("int")
		(startX, startY, endX, endY) = box
		label = labels[r.label_id]

		# draw the bounding box and label on the image
		cv2.rectangle(orig, (startX, startY), (endX, endY),
			(0, 255, 0), 2)
		y = startY - 15 if startY - 15 > 15 else startY + 15
		text = "{}: {:.2f}%".format(label, r.score * 100)
		cv2.putText(orig, text, (startX, y),
			cv2.FONT_HERSHEY_SIMPLEX, 0.5, (0, 255, 0), 2)

	# show the output frame and wait for a key press
	cv2.imshow("Frame", orig)
	key = cv2.waitKey(1) & 0xFF

	# if the `q` key was pressed, break from the loop
	if key == ord("q"):
		break

# do a bit of cleanup
cv2.destroyAllWindows()
vs.stop()
Here we loop over each of the detected objects, grab the bounding box + class label, and annotate the frame (Lines 61-73).
The frame (with object detection annotations) is displayed via Line 76.
We’ll continue to process more frames unless the
"q"(quit) key is pressed at which point we break and clean up (Lines 77-85).
Let’s put this Python + Coral object detection script to work!
To perform video object detection with the Google Coral, make sure you use the “Downloads” section of the guide to download the code + pre-trained models.
From there you can execute the following command to start the object detection script:
$ python detect_video.py \
	--model mobilenet_ssd_v2/mobilenet_ssd_v2_coco_quant_postprocess_edgetpu.tflite \
	--labels mobilenet_ssd_v2/coco_labels.txt
[INFO] parsing class labels...
[INFO] loading Coral model...
W0507 07:43:19.420830     377 package_registry.cc:65] Minimum runtime version required by package (5) is lower than expected (10).
[INFO] starting video stream...
For our final example of applying real-time object detection with the Google Coral, I decided to let Janie in my office for a bit as I recorded a demo (and even decided to sing her a little song) — you can see the result in Figure 4 above.
The problem with the Raspberry Pi 3B+ and Google Coral USB Accelerator
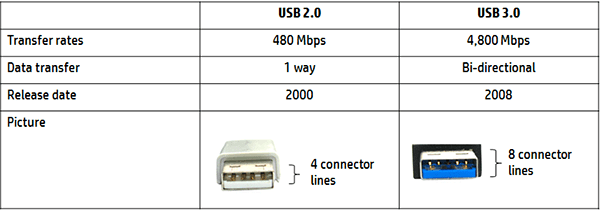
Figure 5: USB 3.0 is much faster than USB 2.0. To take full advantage of Google Coral’s deep learning capabilities a USB 3.0 port is required, however, the Raspberry Pi 3B+ does not include USB 3.0 capability. (image source)
You might have noticed that our inference results are pretty similar to what we obtain with the Movidius NCS — doesn’t Google advertise the Coral USB Accelerator as being faster than the NCS?
What’s the problem here?
Is it the Google Coral?
Is it our code?
Is our device configured incorrectly?
Actually, it’s none of the above.
The problem here is the Raspberry Pi 3B+ only supports USB 2.0.
The bottleneck is the I/O taking place from the CPU, to USB, to the Coral USB Accelerator, and back.
Inference speed will dramatically improve once the Raspberry Pi 4 is released (which will certainly support USB 3, giving us the fastest possible inference speeds with the Coral USB Accelerator).
What about custom models?
This tutorial has focused on state-of-the-art deep learning models that have been pre-trained on popular image datasets, including ImageNet (for classification) and COCO (for object detection).
But what if you wanted to run your own pre-trained models on the Google Coral?
Is this possible?
And if so, how can we do it?
I’ll be answering that exact question inside my upcoming book, Raspberry Pi for Computer Vision.
The book will be released in Autumn 2019, but if you pre-order your copy now, you’ll be getting a discount (the price of the book will increase once it officially releases later this year).
If you’re interested in computer vision + deep learning on embedded devices such as the:
- Raspberry Pi
- Movidius NCS
- Google Coral
- Jetson Nano
…then you should definitely pre-order your copy now.
Summary
In this tutorial, you learned how to utilize your Google Coral USB Accelerator for:
- Image classification
- Image classification in video
- Object detection
- Object detection in video
Specifically, we used pre-trained deep learning models, including:
- Inception V4 (trained on ImageNet)
- MobileNet V4 (trained on ImageNet)
- MobileNet SSD V2 (trained on COCO)
Our results were far, far better than trying to use the Raspberry Pi CPU alone for deep learning inference.
Overall, I was very impressed with how easy it is to use the Google Coral and the
edgetpulibrary in my own custom Python scripts.
I’m looking forward to seeing how the package develops (and hope they make it this easy to convert and run custom deep learning models on the Coral).
To download the source code and pre-trained to this post (and be notified when future tutorials are published here on PyImageSearch), just enter your email address in the form below!
Downloads:
The post Object detection and image classification with Google Coral USB Accelerator appeared first on PyImageSearch.