
In this tutorial, you will learn how to get started with your NVIDIA Jetson Nano, including:
- First boot
- Installing system packages and prerequisites
- Configuring your Python development environment
- Installing Keras and TensorFlow on the Jetson Nano
- Changing the default camera
- Classification and object detection with the Jetson Nano
I’ll also provide my commentary along the way, including what tripped me up when I set up my Jetson Nano, ensuring you avoid the same mistakes I made.
By the time you’re done with this tutorial, your NVIDIA Jetson Nano will be configured and ready for deep learning!
To learn how to get started with the NVIDIA Jetson Nano, just keep reading!
Getting started with the NVIDIA Jetson Nano
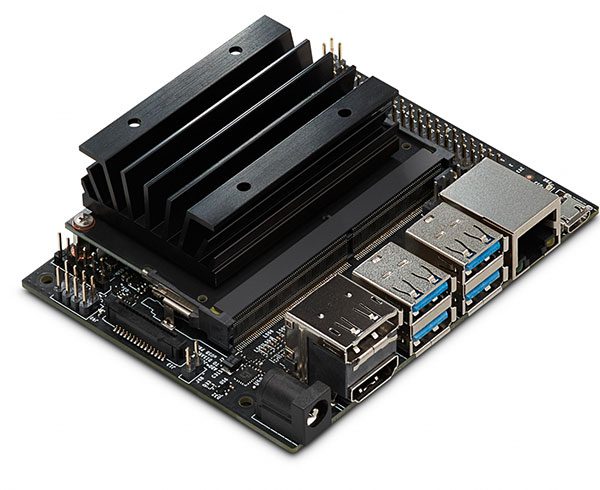
Figure 1: In this blog post, we’ll get started with the NVIDIA Jetson Nano, an AI edge device capable of 472 GFLOPS of computation. At around $100 USD, the device is packed with capability including a Maxwell architecture 128 CUDA core GPU covered up by the massive heatsink shown in the image. (image source)
In the first part of this tutorial, you will learn how to download and flash the NVIDIA Jetson Nano .img file to your micro-SD card. I’ll then show you how to install the required system packages and prerequisites.
From there you will configure your Python development library and learn how to install the Jetson Nano-optimized version of Keras and TensorFlow on your device.
I’ll then show you how to access the camera on your Jetson Nano and even perform image classification and object detection on the Nano as well.
We’ll then wrap up the tutorial with a brief discussion on the Jetson Nano — a full benchmark and comparison between the NVIDIA Jetson Nano, Google Coral, and Movidius NCS will be published in a future blog post.
Before you get started with the Jetson Nano
Before you can even boot up your NVIDIA Jetson Nano you need three things:
- A micro-SD card (minimum 16GB)
- A 5V 2.5A MicroUSB power supply
- An ethernet cable
I really want to stress the minimum of a 16GB micro-SD card. The first time I configured my Jetson Nano I used a 16GB card, but that space was eaten up fast, particularly when I installed the Jetson Inference library which will download a few gigabytes of pre-trained models.
I, therefore, recommend a 32GB micro-SD card for your Nano.
Secondly, when it comes to your 5V 2.5A MicroUSB power supply, in their documentation NVIDIA specifically recommends this one from Adafruit.
Finally, you will need an ethernet cable when working with the Jetson Nano which I find really, really frustrating.
The NVIDIA Jetson Nano is marketed as being a powerful IoT and edge computing device for Artificial Intelligence…
…and if that’s the case, why is there not a WiFi adapter on the device?
I don’t understand NVIDIA’s decision there and I don’t believe it should be up to the end user of the product to “bring their own WiFi adapter”.
If the goal is to bring AI to IoT and edge computing then there should be WiFi.
But I digress.
You can read more about NVIDIA’s recommendations for the Jetson Nano here.
Download and flash the .img file to your micro-SD card
Before we can get started installing any packages or running any demos on the Jetson Nano, we first need to download the Jetson Nano Developer Kit SD Card Image from NVIDIA’s website.
NVIDIA provides documentation for flashing the .img file to a micro-SD card for Windows, macOS, and Linux — you should choose the flash instructions appropriate for your particular operating system.
First boot of the NVIDIA Jetson Nano
After you’ve downloaded and flashed the .img file to your micro-SD card, insert the card into the micro-SD card slot.
I had a hard time finding the card slot — it’s actually underneath the heat sync, right where my finger is pointing to:
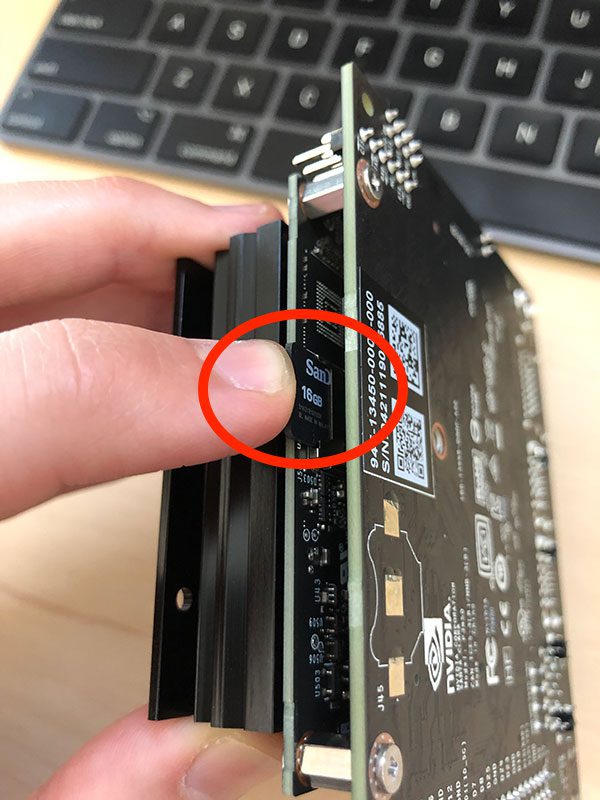
Figure 2: Where is the microSD card slot on the NVIDIA Jetson Nano? The microSD receptacle is hidden under the heatsink as shown in the image.
I think NVIDIA could have made the slot a bit more obvious, or at least better documented it on their website.
After sliding the micro-SD card home, connect your power supply and boot.
Assuming your Jetson Nano is connected to an HDMI output, you should see the following (or similar) displayed to your screen:
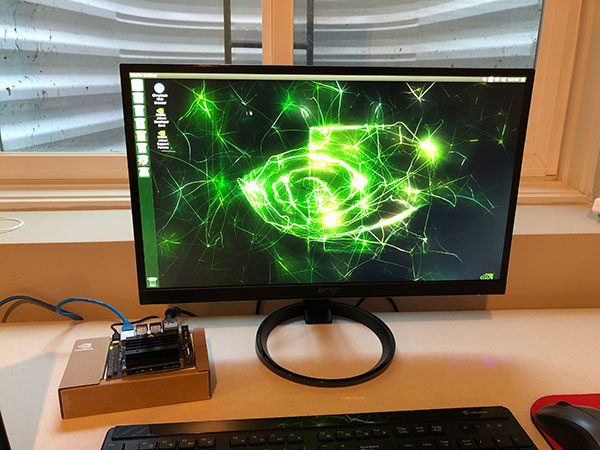
Figure 3: To get started with the NVIDIA Jetson Nano AI device, just flash the .img (preconfigured with Jetpack) and boot. From here we’ll be installing TensorFlow and Keras in a virtual environment.
The Jetson Nano will then walk you through the install process, including setting your username/password, timezone, keyboard layout, etc.
Installing system packages and prerequisites
In the remainder of this guide, I’ll be showing you how to configure your NVIDIA Jetson Nano for deep learning, including:
- Installing system package prerequisites.
- Installing Keras and TensorFlow and Keras on the Jetson Nano.
- Installing the Jetson Inference engine.
Let’s get started by installing the required system packages:
$ sudo apt-get install git cmake
$ sudo apt-get install libatlas-base-dev gfortran
$ sudo apt-get install libhdf5-serial-dev hdf5-tools
$ sudo apt-get install python3-dev
Provided you have a good internet connection, the above commands should only take a few minutes to finish up.
Configuring your Python environment
The next step is to configure our Python development environment.
Let’s first install
pip, Python’s package manager:
$ wget https://bootstrap.pypa.io/get-pip.py
$ sudo python3 get-pip.py
$ rm get-pip.py
We’ll be using Python virtual environments in this guide to keep our Python development environments independent and separate from each other.
Using Python virtual environments are a best practice and will help you avoid having to maintain a micro-SD for each development environment you want to use on your Jetson Nano.
To manage our Python virtual environments we’ll be using virtualenv and virtualenvwrapper which we can install using the following command:
$ sudo pip install virtualenv virtualenvwrapper
Once we’ve installed
virtualenvand
virtualenvwrapperwe need to update our
~/.bashrcfile. I’m choosing to use
nanobut you can use whatever editor you are most comfortable with:
$ nano ~/.bashrc
Scroll down to the bottom of the
~/.bashrcfile and add the following lines:
# virtualenv and virtualenvwrapper
export WORKON_HOME=$HOME/.virtualenvs
export VIRTUALENVWRAPPER_PYTHON=/usr/bin/python3
source /usr/local/bin/virtualenvwrapper.sh
After adding the above lines, save and exit the editor.
Next, we need to reload the contents of the
~/.bashrcfile using the
sourcecommand:
$ source ~/.bashrc
We can now create a Python virtual environment using the
mkvirtualenvcommand — I’m naming my virtual environment
deep_learning, but you can name it whatever you would like:
$ mkvirtualenv deep_learning -p python3
Installing TensorFlow and Keras on the NVIDIA Jetson Nano
Before we can install TensorFlow and Keras on the Jetson Nano, we first need to install NumPy.
First, make sure you are inside the
deep_learningvirtual environment by using the
workoncommand:
$ workon deep_learning
From there, you can install NumPy:
$ pip install numpy
Installing NumPy on my Jetson Nano took ~10-15 minutes to install as it had to be compiled on the system (there currently no pre-built versions of NumPy for the Jetson Nano).
The next step is to install Keras and TensorFlow on the Jetson Nano. You may be tempted to do a simple
pip install tensorflow-gpu— do not do this!
Instead, NVIDIA has provided an official release of TensorFlow for the Jetson Nano.
You can install the official Jetson Nano TensorFlow by using the following command:
$ pip install --extra-index-url https://developer.download.nvidia.com/compute/redist/jp/v42 tensorflow-gpu==1.13.1+nv19.3
Installing NVIDIA’s
tensorflow-gpupackage took ~40 minutes on my Jetson Nano.
The final step here is to install SciPy and Keras:
$ pip install scipy
$ pip install keras
These installs took ~35 minutes.
Compiling and installing Jetson Inference on the Nano
The Jetson Nano .img already has JetPack installed so we can jump immediately to building the Jetson Inference engine.
The first step is to clone down the
jetson-inferencerepo:
$ git clone https://github.com/dusty-nv/jetson-inference
$ cd jetson-inference
$ git submodule update --init
We can then configure the build using
cmake.
$ mkdir build
$ cd build
$ cmake ..
There are two important things to note when running cmake
:
- The
cmake
command will ask for root permissions so don’t walk away from the Nano until you’ve provided your root credentials. - During the configure process,
cmake
will also download a few gigabytes of pre-trained sample models. Make sure you have a few GB to spare on your micro-SD card! (This is also why I recommend a 32GB microSD card instead of a 16GB card).
After
cmakehas finished configuring the build, we can compile and install the Jetson Inference engine:
$ make
$ sudo make install
Compiling and installing the Jetson Inference engine on the Nano took just over 3 minutes.
What about installing OpenCV?
I decided to cover installing OpenCV on a Jetson Nano in a future tutorial. There are a number of
cmakeconfigurations that need to be set to take full advantage of OpenCV on the Nano, and frankly, this post is long enough as is.
Again, I’ll be covering how to configure and install OpenCV on a Jetson Nano in a future tutorial.
Running the NVIDIA Jetson Nano demos
When using the NVIDIA Jetson Nano you have two options for input camera devices:
- A CSI camera module, such as the Raspberry Pi camera module (which is compatible with the Jetson Nano, by the way)
- A USB webcam
I’m currently using all of my Raspberry Pi camera modules for my upcoming book, Raspberry Pi for Computer Vision so I decided to use my Logitech C920 which is plug-and-play compatible with the Nano (you could use the newer Logitech C960 as well).
The examples included with the Jetson Nano Inference library can be found in
jetson-inference:
detectnet-camera
: Performs object detection using a camera as an input.detectnet-console
: Also performs object detection, but using an input image rather than a camera.imagenet-camera
: Performs image classification using a camera.imagenet-console
: Classifies an input image using a network pre-trained on the ImageNet dataset.segnet-camera
: Performs semantic segmentation from an input camera.segnet-console
: Also performs semantic segmentation, but on an image.- A few other examples are included as well, including deep homography estimation and super resolution.
However, in order to run these examples, we need to slightly modify the source code for the respective cameras.
In each example you’ll see that the
DEFAULT_CAMERAvalue is set to
-1, implying that an attached CSI camera should be used.
However, since we are using a USB camera, we need to change the
DEFAULT_CAMERAvalue from
-1to
0(or whatever the correct
/dev/videoV4L2 camera is).
Luckily, this change is super easy to do!
Let’s start with image classification as an example.
First, change directory into
~/jetson-inference/imagenet-camera:
$ cd ~/jetson-inference/imagenet-camera
From there, open up
imagenet-camera.cpp:
$ nano imagenet-camera.cpp
You’ll then want to scroll down to approximately Line 37 where you’ll see the
DEFAULT_CAMERAvalue:
#define DEFAULT_CAMERA -1 // -1 for onboard camera, or change to index of /dev/video V4L2 camera (>=0)
Simply change that value from
-1to
0:
#define DEFAULT_CAMERA 0 // -1 for onboard camera, or change to index of /dev/video V4L2 camera (>=0)
From there, save and exit the editor.
After editing the C++ file you will need to recompile the example which is as simple as:
$ cd ../build
$ make
$ sudo make install
Keep in mind that
makeis smart enough to not recompile the entire library. It will only recompile files that have changed (in this case, the ImageNet classification example).
Once compiled, change to the
aarch64/bindirectory and execute the
imagenet-camerabinary:
$ cd aarch64/bin/
$ ./imagenet-camera
imagenet-camera
  args (1):  0 [./imagenet-camera]

[gstreamer] initialized gstreamer, version 1.14.1.0
[gstreamer] gstCamera attempting to initialize with GST_SOURCE_NVCAMERA
[gstreamer] gstCamera pipeline string:
v4l2src device=/dev/video0 ! video/x-raw, width=(int)1280, height=(int)720, format=YUY2 ! videoconvert ! video/x-raw, format=RGB ! videoconvert !appsink name=mysink
[gstreamer] gstCamera successfully initialized with GST_SOURCE_V4L2

imagenet-camera:  successfully initialized video device
    width:  1280
   height:  720
    depth:  24 (bpp)


imageNet -- loading classification network model from:
         -- prototxt     networks/googlenet.prototxt
         -- model        networks/bvlc_googlenet.caffemodel
         -- class_labels networks/ilsvrc12_synset_words.txt
         -- input_blob   'data'
         -- output_blob  'prob'
         -- batch_size   2

[TRT]  TensorRT version 5.0.6
[TRT]  detected model format - caffe  (extension '.caffemodel')
[TRT]  desired precision specified for GPU: FASTEST
[TRT]  requested fasted precision for device GPU without providing valid calibrator, disabling INT8
[TRT]  native precisions detected for GPU:  FP32, FP16
[TRT]  selecting fastest native precision for GPU:  FP16
[TRT]  attempting to open engine cache file networks/bvlc_googlenet.caffemodel.2.1.GPU.FP16.engine
[TRT]  loading network profile from engine cache... networks/bvlc_googlenet.caffemodel.2.1.GPU.FP16.engine
[TRT]  device GPU, networks/bvlc_googlenet.caffemodel loaded
Here you can see that the GoogLeNet is loaded into memory, after which inference starts:
Image classification is running at ~10 FPS on the Jetson Nano at 1280×720.
IMPORTANT: If this is the first time you are loading a particular model then it could take 5-15 minutes to load the model.
Internally, the Jetson Nano Inference library is optimizing and preparing the model for inference. This only has to be done once so subsequent runs of the program will be significantly faster (in terms of model loading time, not inference).
Now that we’ve tried image classification, let’s look at the object detection example on the Jetson Nano which is located in
~/jetson-inference/detectnet-camera/detectnet-camera.cpp.
Again, if you are using a USB webcam you’ll want to edit approximately Line 39 of
detectnet-camera.cppand change
DEFAULT_CAMERAfrom
-1to
0and then recompile via
make(again, only necessary if you are using a USB webcam).
After compiling you can find the
detectnet-camerabinary in
~/jetson-inference/build/aarch64/bin.
Let’s go ahead and run the object detection demo on the Jetson Nano now:
$ ./detectnet-camera
detectnet-camera
  args (1):  0 [./detectnet-camera]

[gstreamer] initialized gstreamer, version 1.14.1.0
[gstreamer] gstCamera attempting to initialize with GST_SOURCE_NVCAMERA
[gstreamer] gstCamera pipeline string:
v4l2src device=/dev/video0 ! video/x-raw, width=(int)1280, height=(int)720, format=YUY2 ! videoconvert ! video/x-raw, format=RGB ! videoconvert !appsink name=mysink
[gstreamer] gstCamera successfully initialized with GST_SOURCE_V4L2

detectnet-camera:  successfully initialized video device
    width:  1280
   height:  720
    depth:  24 (bpp)


detectNet -- loading detection network model from:
          -- prototxt     networks/ped-100/deploy.prototxt
          -- model        networks/ped-100/snapshot_iter_70800.caffemodel
          -- input_blob   'data'
          -- output_cvg   'coverage'
          -- output_bbox  'bboxes'
          -- mean_pixel   0.000000
          -- class_labels networks/ped-100/class_labels.txt
          -- threshold    0.500000
          -- batch_size   2

[TRT]  TensorRT version 5.0.6
[TRT]  detected model format - caffe  (extension '.caffemodel')
[TRT]  desired precision specified for GPU: FASTEST
[TRT]  requested fasted precision for device GPU without providing valid calibrator, disabling INT8
[TRT]  native precisions detected for GPU:  FP32, FP16
[TRT]  selecting fastest native precision for GPU:  FP16
[TRT]  attempting to open engine cache file networks/ped-100/snapshot_iter_70800.caffemodel.2.1.GPU.FP16.engine
[TRT]  loading network profile from engine cache... networks/ped-100/snapshot_iter_70800.caffemodel.2.1.GPU.FP16.engine
[TRT]  device GPU, networks/ped-100/snapshot_iter_70800.caffemodel loaded
Here you can see that we are loading a model named
ped-100used for pedestrian detection (I’m actually not sure what the specific architecture is as it’s not documented on NVIDIA’s website — if you know what architecture is being used, please leave a comment on this post).
Below you can see an example of myself being detected using the Jetson Nano object detection demo:
According to the output of the program, we’re obtaining ~5 FPS for object detection on 1280×720 frames when using the Jetson Nano. Not too bad!
How does the Jetson Nano compare to the Movidius NCS or Google Coral?
This tutorial is simply meant to be a getting started guide for your Jetson Nano — it is not meant to compare the Nano to the Coral or NCS.
I’m in the process of comparing each of the respective embedded systems and will be providing a full benchmark/comparison in a future blog post.
In the meantime, take a look at the following guides to help you configure your embedded devices and start running benchmarks of your own:
- Getting started with Google Coral’s TPU USB Accelerator
- OpenVINO, OpenCV, and Movidius NCS on the Raspberry Pi
How do I deploy custom models to the Jetson Nano?
One of the benefits of the Jetson Nano is that once you compile and install a library with GPU support (compatible with the Nano, of course), your code will automatically use the Nano’s GPU for inference.
For example:
Earlier in this tutorial, we installed Keras + TensorFlow on the Nano. Any Python scripts that leverage Keras/TensorFlow will automatically use the GPU.
And similarly, any pre-trained Keras/TensorFlow models we use will also automatically use the Jetson Nano GPU for inference.
Pretty awesome, right?
Provided the Jetson Nano supports a given deep learning library (Keras, TensorFlow, Caffe, Torch/PyTorch, etc.), we can easily deploy our models to the Jetson Nano.
The problem here is OpenCV.
OpenCV’s Deep Neural Network (
dnn) module does not support NVIDIA GPUs, including the Jetson Nano.
OpenCV is working to provide NVIDIA GPU support for their
dnnmodule. Hopefully, it will be released by the end of the summer/autumn.
But until then we cannot leverage OpenCV’s easy to use
cv2.dnnfunctions.
If using the
cv2.dnnmodule is an absolute must for you right now, then I would suggest taking a look at Intel’s OpenVINO toolkit, the Movidius NCS, and their other OpenVINO-compatible products, all of which are optimized to work with OpenCV’s deep neural network module.
If you’re interested in learning more about the Movidius NCS and OpenVINO (including benchmark examples), be sure to refer to this tutorial.
Interested in using the NVIDIA Jetson Nano in your own projects?

I bet you’re just as excited about the NVIDIA Jetson Nano as I am. In contrast to pairing the Raspberry Pi with with either the Movidius NCS or Google Coral, the Jetson Nano has it all built right in (minus WiFi) to powerfully conduct computer vision and deep learning at the edge.
In my opinion, embedded CV and DL is the next big wave in the AI community. It’s so big that it may even be a tsunami — will you be riding that wave?
To help you get your start in embedded Computer Vision and Deep Learning, I have decided to write a brand new book — Raspberry Pi for Computer Vision.
I’ve chosen to focus on the Raspberry Pi as it is the best entry-level device for getting started into the world of computer vision for IoT.
But I’m not stopping there. Inside the book, we’ll:
- Augment the Raspberry Pi with the Google Coral and Movidius NCS coprocessors.
- Apply the same skills we learn with the RPi to a device with more horsepower: NVIDIA’s Jetson Nano.
Additionally, you’ll learn how to:
- Build practical, real-world computer vision applications on the Pi.
- Create computer vision and Internet of Things (IoT) projects and applications with the RPi.
- Optimize your OpenCV code and algorithms on the resource-constrained Pi.
- Perform Deep Learning on the Raspberry Pi (including utilizing the Movidius NCS and OpenVINO toolkit).
- Configure your Google Coral, perform image classification and object detection, and even train + deploy your own custom models to the Coral Edge TPU!
- Utilize the NVIDIA Jetson Nano to run multiple deep neural networks on a single board, including image classification, object detection, segmentation, and more!
I’m running a Kickstarter campaign to fund the creation of the new book, and to celebrate, I’m offering 25% OFF my existing books and courses if you pre-order a copy of RPi for CV.
In fact, the Raspberry Pi for Computer Vision book is practically free if you pre-order it with Deep Learning for Computer Vision with Python or the PyImageSearch Gurus course.
The clock is ticking and these discounts won’t last — the Kickstarter pre-sale shuts down on this Friday (May 10th) at 10AM EDT, after which I’m taking the deals down.
Reserve your pre-sale book now and while you are there, grab another course or book at a discounted rate.
Summary
In this tutorial, you learned how to get started with the NVIDIA Jetson Nano.
Specifically, you learned how to install the required system packages, configure your development environment, and install Keras and TensorFlow on the Jetson Nano.
We wrapped up learning how to change the default camera and perform image classification and object detection on the Jetson Nano using the pre-supplied scripts.
I’ll be providing a full comparison and benchmarks of the NVIDIA Jetson Nano, Google, Coral, and Movidius NCS in a future tutorial.
To be notified when future tutorials are published here on PyImageSearch (including the Jetson Nano vs. Google Coral vs. Movidus NCS benchmark), just enter your email address in the form below!
The post Getting started with the NVIDIA Jetson Nano appeared first on PyImageSearch.