
In this tutorial, you will learn how to perform online/incremental learning with Keras and Creme on datasets too large to fit into memory.
A few weeks ago I showed you how to use Keras for feature extraction and online learning — we used that tutorial to perform transfer learning and recognize classes the original CNN was never trained on.
To accomplish that task we needed to use Keras to train a very simple feedforward neural network on the features extracted from the images.
However, what if we didn’t want to train a neural network?
What if we instead wanted to train a Logistic Regression, Naive Bayes, or Decision Tree model on top of the data? Or what if we wanted to perform feature selection or feature processing before training such a model?
You may be tempted to use scikit-learn — but you’ll soon realize that scikit-learn does not treat incremental learning as a “first-class citizen” — only a few online learning implementations are included in scikit-learn and they are awkward to use, to say the least.
Instead, you should use Creme, which:
- Implements a number of popular algorithms for classification, regression, feature selection, and feature preprocessing.
- Has an API similar to scikit-learn.
- And makes it super easy to perform online/incremental learning.
In the remainder of this tutorial I will show you how to:
- Use Keras + pre-trained CNNs to extract robust, discriminative features from an image dataset.
- Utilize Creme to perform incremental learning on a dataset too large to fit into RAM.
Let’s get started!
To learn how to perform online/incremental learning with Keras and Creme, just keep reading!
Looking for the source code to this post?
Jump right to the downloads section.
Online/Incremental Learning with Keras and Creme
In the first part of this tutorial, we’ll discuss situations where we may want to perform online learning or incremental learning.
We’ll then discuss why the Creme machine learning library is the appropriate choice for incremental learning.
We’ll be using Kaggle’s Dogs vs. Cats dataset for this tutorial — we’ll spend some time briefly reviewing the dataset.
From there, we’ll take a look at our directory structure from the project.
Once we understand the directory structure, we’ll implement a Python script that will be used to extract features from the Dogs vs. Cats dataset using Keras and a CNN pre-trained on ImageNet.
Given our extracted features (which will be too big to fit into RAM), we’ll use Creme to train a Logistic Regression model in an incremental learning fashion, ensuring that:
- We can still train our classifier, despite the extracted features being too large to fit into memory.
- We can still obtain high accuracy, even though we didn’t have access to “all” features at once.
Why Online Learning/Incremental Learning?
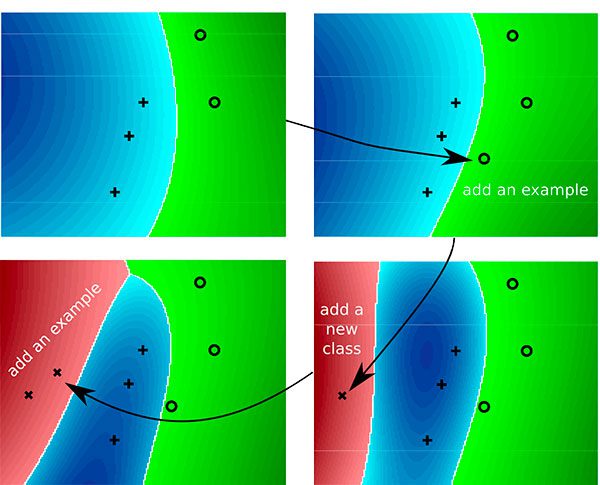
Figure 1: Multi-class incremental learning with Creme allows for machine learning on datasets which are too large to fit into memory (image source).
Whether you’re working with image data, text data, audio data, or numerical/categorical data, you’ll eventually run into a dataset that is too large to fit into memory.
What then?
- Do you head to Amazon, NewEgg, etc. and purchase an upgraded motherboard with maxed out RAM?
- Do you spin up a high memory instance on a cloud service provider like AWS or Azure?
You could look into one of those options — and in some cases, they are totally reasonable avenues to explore.
But my first choice would be to apply online/incremental learning.
Using incremental learning you can work with datasets too large to fit into RAM and apply popular machine learning techniques, including:
- Feature preprocessing
- Feature selection
- Classification
- Regression
- Clustering
- Ensemble methods
- …and more!
Incremental learning can be super powerful — and today you’ll learn how to apply it to your own data.
Why Creme for Incremental Learning?
Figure 2: Creme is a library specifically tailored to incremental learning. The API is similar to that of scikit-learn’s which will make you feel at home while putting it to work on large datasets where incremental learning is required.
Neural networks and deep learning are a form of incremental learning — we can train such networks on one sample or one batch at a time.
However, just because we can apply neural networks to a problem doesn’t mean we should.
Instead, we need to bring the right tool to the job. Just because you have a hammer in your hand doesn’t mean you would use it to bang in a screw.
Incremental learning algorithms encompass a set of techniques used to train models in an incremental fashion.
We often utilize incremental learning when a dataset is too large to fit into memory.
The scikit-learn library does include a small handful of online learning algorithms, however:
- It does not treat incremental learning as a first-class citizen.
- The implementations are awkward to use.
Enter the Creme library — a library exclusively dedicated to incremental learning with Python.
The library itself is fairly new but last week I had some time to hack around with it.
I really enjoyed the experience and found the scikit-learn inspired API very easy to use.
After going through the rest of this tutorial, I think you’ll agree with me when I say, Creme is a great little library and I wish the developers and maintainers all the best with it — I hope that the library continues to grow.
The Dogs vs. Cats Dataset

Figure 3: In today’s example, we’re using Kaggle’s Dogs vs. Cats dataset. We’ll extract features with Keras producing a rather large features CSV. From there, we’ll apply incremental learning with Creme.
The dataset we’ll be using here today is Kaggle’s Dogs vs. Cats dataset.
The dataset includes 25,000 examples, evenly distributed:
- Dogs: 12,500 images
- Cats: 12,500 images
Our goal is to apply transfer learning to:
- Extract features from the dataset using Keras and a pre-trained CNN.
- Use online/incremental learning via Creme to train a classifier on top of the features in an incremental fashion.
Setting up your Creme environment
While Creme requires a simple pip install, we have some other packages to install for today’s example too. Today’s required packages include:
- imutils and OpenCV (a dependency of imutils)
- scikit-learn
- TensorFlow
- Keras
- Creme
First, head over to my pip install opencv tutorial to install OpenCV in a Python virtual environment. The OpenCV installation instructions suggest an environment named
cvbut you can name yours whatever you’d like.
From there, install the rest of the packages in your environment:
$ workon cv
$ pip install imutils
$ pip install scikit-learn
$ pip install tensorflow # or tensorflow-gpu
$ pip install keras
$ pip install creme
Let’s ensure everything is properly installed by launching a Python interpreter:
$ workon cv
$ python
>>> import cv2
>>> import imutils
>>> import sklearn
>>> import keras
Using TensorFlow backend.
>>> import creme
>>>
Provided that there are no errors, your environment is ready for incremental learning.
Project Structure
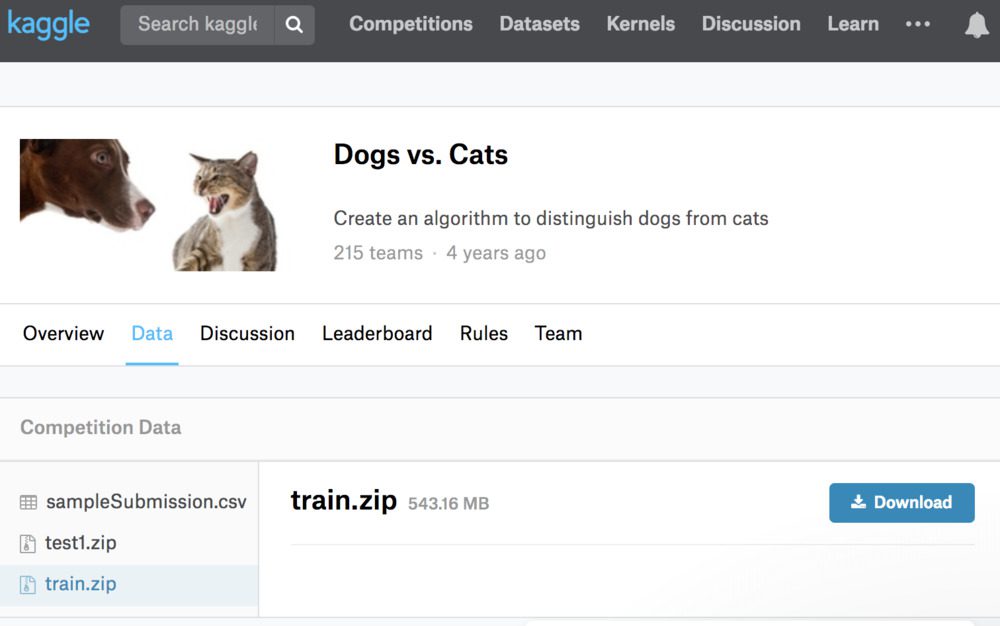
Figure 4: Download train.zip from the Kaggle Dogs vs. Cats downloads page for this incremental learning with Creme project.
To set up your project, please follow the following steps:
- Use the “Downloads” section of this blog post and follow the instructions to download the code.
- Download the code to somewhere on your system. For example, you could download it to your
~/Desktop
or~/Downloads
folder. - Open a terminal,
cd
into the same folder where the zip resizes. Unzip/extract the files viaunzip keras-creme-incremental-learning.zip
. Keep your terminal open. - Log into Kaggle (required for downloading data).
- Head to the Kaggle Dogs vs. Cats “Data” page.
- Click the little download button next to only the train.zip file. Save it into
~/Desktop/keras-creme-incremental-learning/
(or wherever you extracted the blog post files). - Back in your terminal, extract the dataset via
unzip train.zip
.
Now let’s review our project structure:
$ tree --dirsfirst --filelimit 10
.
├── train [25000 entries]
├── train.zip
├── features.csv
├── extract_features.py
└── train_incremental.py

1 directory, 4 files
You should see a
train/directory with 25,000 files. This is where your actual dog and cat images reside. Let’s list a handful of them:
$ ls train | sort -R | head -n 10
dog.271.jpg
cat.5399.jpg
dog.3501.jpg
dog.5453.jpg
cat.7122.jpg
cat.2018.jpg
cat.2298.jpg
dog.3439.jpg
dog.1532.jpg
cat.1742.jpg
As you can see, the class label (either “cat” or “dog”) is included in the first few characters of the filename. We’ll parse the class name out later.
Back to our project tree, under the
train/directory are
train.zipand
features.csv. These files are not included with the “Downloads”. You should have already downloaded and extracted
train.zipfrom Kaggle’s website. We will learn how to extract features and generate the large 12GB+
features.csvfile in the next section.
The two Python scripts we’ll be reviewing are
extract_features.pyand
train_incremental.py. Let’s begin by extracting features with Keras!
Extracting Features with Keras
Before we can perform incremental learning, we first need to perform transfer learning and extract features from our Dogs vs. Cats dataset.
To accomplish this task, we’ll be using the Keras deep learning library and the ResNet50 network (pre-trained on ImageNet). Using ResNet50, we’ll allow our images to forward propagate to a pre-specified layer.
We’ll then take the output activations of that layer and treat them as a feature vector. Once we have feature vectors for all images in our dataset, we’ll then apply incremental learning.
Let’s go ahead and get started.
Open up the
extract_features.pyfile and insert the following code:
# import the necessary packages
from sklearn.preprocessing import LabelEncoder
from keras.applications import ResNet50
from keras.applications import imagenet_utils
from keras.preprocessing.image import img_to_array
from keras.preprocessing.image import load_img
from imutils import paths
import numpy as np
import argparse
import pickle
import random
import os

# construct the argument parser and parse the arguments
ap = argparse.ArgumentParser()
ap.add_argument("-d", "--dataset", required=True,
	help="path to input dataset")
ap.add_argument("-c", "--csv", required=True,
	help="path to output CSV file")
ap.add_argument("-b", "--batch-size", type=int, default=32,
	help="batch size for the network")
args = vars(ap.parse_args())
On Lines 2-12, all the packages necessary for extracting features are imported. Most notably this includes
ResNet50. ResNet50 is the convolutional neural network (CNN) we are using for transfer learning (Line 3).
Three command line arguments are then parsed via Lines 15-22:
--dataset
: The path to our input dataset (i.e. Dogs vs. Cats).--csv
: File path to our output CSV file.--batch-size
: By default, we’ll use a batch size of32
. This will accommodate most CPUs and GPUs.
Let’s go ahead and load our model:
# load the ResNet50 network and store the batch size in a convenience
# variable
print("[INFO] loading network...")
model = ResNet50(weights="imagenet", include_top=False)
bs = args["batch_size"]
On Line 27, we load the
modelwhile specifying two parameters:
weights="imagenet"
: Pre-trained ImageNet weights are loaded for transfer learning.include_top=False
: We do not include the fully-connected head with the softmax classifier. In other words, we chop off the head of the network.
With weights loaded, and by loading our model without the head, we are now ready for transfer learning. We will use the output values of the network directly, storing the results as feature vectors.
Our feature vectors will each be 100,352-dim (i.e. 7 x 7 x 2048 which are the dimensions of the output volume of ResNet50 without the FC layer header).
From here, let’s grab our
imagePathsand extract our labels:
# grab all image paths in the input directory and randomly shuffle
# the paths
imagePaths = list(paths.list_images(args["dataset"]))
random.seed(42)
random.shuffle(imagePaths)

# extract the class labels from the image paths, then encode the
# labels
labels = [p.split(os.path.sep)[-1].split(".")[0] for p in imagePaths]
le = LabelEncoder()
labels = le.fit_transform(labels)
On Lines 32-34, we proceed to grab all
imagePathsand randomly shuffle them.
From there, our class
labelsare extracted from the paths themselves (Line 38). Each image path as the format:
train/cat.0.jpg
train/dog.0.jpg
- etc.
In a Python interpreter, we can test Line 38 for sanity. As you develop the parsing + list comprehension, your interpreter might look like this:
$ python
>>> import os
>>> label = "train/cat.0.jpg".split(os.path.sep)[-1].split(".")[0]
>>> label
'cat'
>>> imagePaths = ["train/cat.0.jpg", "train/dog.0.jpg", "train/dog.1.jpg"]
>>> labels = [p.split(os.path.sep)[-1].split(".")[0] for p in imagePaths]
>>> labels
['cat', 'dog', 'dog']
>>>
Lines 39 and 40 then instantiate and fit our label encoder, ensuring we can convert the string class labels to integers.
Let’s define our CSV columns and write them to the file:
# define our set of columns
cols = ["feat_{}".format(i) for i in range(0, 7 * 7 * 2048)]
cols = ["class"] + cols

# open the CSV file for writing and write the columns names to the
# file
csv = open(args["csv"], "w")
csv.write("{}\n".format(",".join(cols)))
We’ll be writing our extracted features to a CSV file.
The Creme library requires that the CSV file has a header and includes a name for each of the columns, namely:
- The name of the column for the class label
- A name for each of the features
Line 43 creates column names for each of the 7 x 7 x 2048 = 100,352 features while Line 44 defines the class name column (which will store the class label).
Thus, the first five rows and ten columns our CSV file will look like this:
$ head -n 5 features.csv | cut -d ',' -f 1-10
class,feat_0,feat_1,feat_2,feat_3,feat_4,feat_5,feat_6,feat_7,feat_8
1,0.0,0.0,0.0,0.0,0.0,0.0,0.0,0.0,0.0
1,0.0,0.0,0.0,0.0,0.0,0.0,0.0,0.0,0.0
0,0.0,0.0,0.0,0.0,0.0,0.0,0.0,0.0,0.0
0,0.0,0.0,0.0,0.0,0.0,0.0,0.0,0.0,0.0
Notice how the
classis the first column. Then the columns span from
feat_0all the way to
feat_100351for a total of 100,352 features. If you edit the command to print more than 10 columns — say 5,000 — then you’ll see that not all the values are 0.
Moving on, let’s proceed to loop over the images in batches:
# loop over the images in batches
for (b, i) in enumerate(range(0, len(imagePaths), bs)):
	# extract the batch of images and labels, then initialize the
	# list of actual images that will be passed through the network
	# for feature extraction
	print("[INFO] processing batch {}/{}".format(b + 1,
		int(np.ceil(len(imagePaths) / float(bs)))))
	batchPaths = imagePaths[i:i + bs]
	batchLabels = labels[i:i + bs]
	batchImages = []
We’ll loop over
imagePathsin batches of size
bs(Line 52).
Lines 58 and 59 then grab the batch of paths and labels, while Line 60 initializes a list to hold the batch of images.
Let’s loop over the current batch:
# loop over the images and labels in the current batch
	for imagePath in batchPaths:
		# load the input image using the Keras helper utility while
		# ensuring the image is resized to 224x224 pixels
		image = load_img(imagePath, target_size=(224, 224))
		image = img_to_array(image)

		# preprocess the image by (1) expanding the dimensions and
		# (2) subtracting the mean RGB pixel intensity from the
		# ImageNet dataset
		image = np.expand_dims(image, axis=0)
		image = imagenet_utils.preprocess_input(image)

		# add the image to the batch
		batchImages.append(image)
Looping over paths in the batch (Line 63), we will load each
image, preprocess it, and gather it into
batchImages. The
imageitself is loaded on Line 66.
We’ll preprocess the image by:
- Resizing to 224×224 pixels via the
target_size
parameter on Line 66. - Converting to array format (Line 67).
- Adding a batch dimension (Line 72).
- Performing mean subtraction (Line 73).
Note: If these preprocessing steps appear foreign, please refer to Deep Learning for Computer Vision with Python where I cover them in detail.
Finally, the
imageis added to the batch via Line 76.
In order to extract features, we’ll now pass the batch of images through our network:
# pass the images through the network and use the outputs as our
	# actual features, then reshape the features into a flattened
	# volume
	batchImages = np.vstack(batchImages)
	features = model.predict(batchImages, batch_size=bs)
	features = features.reshape((features.shape[0], 7 * 7 * 2048))

	# loop over the class labels and extracted features
	for (label, vec) in zip(batchLabels, features):
		# construct a row that consists of the class label and extracted
		# features
		vec = ",".join([str(v) for v in vec])
		csv.write("{},{}\n".format(label, vec))

# close the CSV file
csv.close()
Our batch of images is sent through the network via Lines 81 and 82.
Keep in mind that we have removed the fully-connected head layer of the network. Instead, the forward propagation stops prior to the average pooling layer. We will treat the output of this layer as a list of
features, also known as a “feature vector”.
The output dimension of the volume is (batch_size, 7 x 7 x ,2048). We can thus
reshapethe
featuresinto a NumPy array of shape
(batch_size, 7 * 7 * 2048), treating the output of the CNN as a feature vector.
Maintaining our batch efficiency, the
featuresand associated class labels are written to our CSV file (Lines 86-90).
Inside the CSV file, the class
labelis the first field in each row (enabling us to easily extract it from the row during training). The feature
vecfollows.
The features CSV file is closed via Line 93, as the last step of our script.
Applying feature extraction with Keras
Now that we’ve coded up
extract_features.py, let’s apply it to our dataset.
Make sure you have:
- Used the “Downloads” section of this tutorial to download the source code.
- Downloaded the Dogs vs. Cats dataset from Kaggle’s website.
Open up a terminal and execute the following command:
$ python extract_features.py --dataset train --csv features.csv
Using TensorFlow backend.
[INFO] loading network...
[INFO] processing batch 1/782
[INFO] processing batch 2/782
[INFO] processing batch 3/782
...
[INFO] processing batch 780/782
[INFO] processing batch 781/782
[INFO] processing batch 782/782
Using an NVIDIA K80 GPU the entire feature extraction process took 20m45s.
You could also use your CPU but keep in mind that the feature extraction process will take much longer.
After your script finishes running, take a look at the output size of
features.csv:
$ ls -lh features.csv
-rw-rw-r-- 1 ubuntu ubuntu 12G Jun  10 11:16 features.csv
The resulting file is over 12GB!
And if we were to load that file into RAM, assuming 32-bit floats for the feature vectors, we would need 10.03GB!
Your machine may or may not have that much RAM…but that’s not the point. Eventually, you will encounter a dataset that is too large for you to work with in main memory. When that time comes, you need need to use incremental learning.
Incremental Learning with Creme
If you’re at this point in the tutorial then I will assume you have extracted features from the Dogs vs. Cats dataset using Keras and ResNet50 (pre-trained on ImageNet).
But what now?
We’ve made the assumption that the entire dataset of extracted feature vectors are too large to fit into memory — how can we train a machine learning classifier on that data?
Open up the
train_incremental.pyfile and let’s find out:
# import the necessary packages
from creme.linear_model import LogisticRegression
from creme.multiclass import OneVsRestClassifier
from creme.preprocessing import StandardScaler
from creme.compose import Pipeline
from creme.metrics import Accuracy
from creme import stream
import argparse
Lines 2-8 import packages required for incremental learning with Creme. We’ll be taking advantage of Creme’s implementation of
LogisticRegression. Creme’s
streammodule includes a super convenient CSV data generator. Throughout training, we’ll calculate and print out our current
Accuracywith Creme’s built in
metricstool.
Let’s now use argparse to parse our command line arguments:
# construct the argument parser and parse the arguments
ap = argparse.ArgumentParser()
ap.add_argument("-c", "--csv", required=True,
	help="path to features CSV file")
ap.add_argument("-n", "--cols", type=int, required=True,
	help="# of feature columns in the CSV file (excluding class column")
args = vars(ap.parse_args())
Our two command line arguments include:
--csv
: The path to our input CSV features file.--cols
: Dimensions of our feature vector (i.e. how many columns there are in our feature vector).
Now that we’ve parsed our command line arguments, we need to specify the data types of our CSV file to use Creme’s
streammodule properly:
# construct our data dictionary which maps the data types of the
# columns in the CSV file to built-in data types
print("[INFO] building column names...")
types = {"feat_{}".format(i): float for i in range(0, args["cols"])}
types["class"] = int
Line 21 builds a list of data types (floats) for every feature column of our CSV. We will have 100,352 floats.
Similarly, Line 22 specifies that our
classcolumn is an integer type.
Next, let’s initialize our data generator and construct our pipeline:
# create a CSV data generator for the extracted Keras features
dataset = stream.iter_csv(args["csv"], target_name="class", types=types)

# construct our pipeline
model = Pipeline([
	("scale", StandardScaler()),
	("learn", OneVsRestClassifier(
		binary_classifier=LogisticRegression()))
])
Line 25 creates a CSV iterator that will
streamfeatures + class labels to our model.
Lines 28-32 then constructs the model pipeline which:
- First performs standard scaling (scales data to have zero mean and unit variance).
- Then trains our Logistic Regression model in an incremental fashion (one data point at a time).
Logistic Regression is a binary classifier meaning that it can be used to predict only two classes (which is exactly what the Dogs vs. Cats dataset is).
However, if you want to recognize > 2 classes, you need to wrap
LogisticRegressionin a
OneVsRestClassifierwhich fits one binary classifier per class.
Note: There’s no harm in wrapping LogisticRegression
in a OneVsRestClassifier
for binary classification so I chose to do so here, just so you can see how it’s done — just keep in mind that it’s not required for binary classification but is required for > 2 classes.
Let’s put Creme to work to train our model:
# initialize our metric
print("[INFO] starting training...")
metric = Accuracy()

# loop over the dataset
for (i, (X, y)) in enumerate(dataset):
	# make predictions on the current set of features, train the
	# model on the features, and then update our metric
	preds = model.predict_one(X)
	model = model.fit_one(X, y)
	metric = metric.update(y, preds)
	print("INFO] update {} - {}".format(i, metric))

# show the accuracy of the model
print("[INFO] final - {}".format(metric))
Line 36 initializes our
metric(i.e., accuracy).
From there, we begin to loop over our dataset (Line 39). Inside the loop, we:
- Make a prediction on the current data point (Line 42). There are 25,000 data points (images), so this loop will run that many times.
- Update the
model
weights based on the prediction (Line 43). - Update and display our accuracy
metric
(Lines 44 and 45).
Finally, the accuracy of the model is displayed in the terminal (Line 48).
Incremental Learning Results
We are now ready to apply incremental learning using Keras and Creme. Make sure you have:
- Used the “Downloads” section of this tutorial to download the source code.
- Downloaded the Dogs vs. Cats dataset from Kaggle’s website.
From there, open up a terminal and execute the following command:
$ python train_incremental.py --csv features.csv --cols 100352
[INFO] building column names...
[INFO] starting training...
INFO] update 0 - Accuracy: 0.
INFO] update 1 - Accuracy: 0.
INFO] update 2 - Accuracy: 0.333333
INFO] update 3 - Accuracy: 0.5
INFO] update 4 - Accuracy: 0.6
INFO] update 5 - Accuracy: 0.5
INFO] update 6 - Accuracy: 0.571429
INFO] update 7 - Accuracy: 0.625
INFO] update 8 - Accuracy: 0.666667
INFO] update 9 - Accuracy: 0.7
INFO] update 10 - Accuracy: 0.727273
INFO] update 11 - Accuracy: 0.75
INFO] update 12 - Accuracy: 0.769231
INFO] update 13 - Accuracy: 0.714286
INFO] update 14 - Accuracy: 0.733333
INFO] update 15 - Accuracy: 0.75
INFO] update 16 - Accuracy: 0.705882
INFO] update 17 - Accuracy: 0.722222
INFO] update 18 - Accuracy: 0.736842
INFO] update 19 - Accuracy: 0.75
INFO] update 21 - Accuracy: 0.761906
...
INFO] update 24980 - Accuracy: 0.9741
INFO] update 24981 - Accuracy: 0.974101
INFO] update 24982 - Accuracy: 0.974102
INFO] update 24983 - Accuracy: 0.974103
INFO] update 24984 - Accuracy: 0.974104
INFO] update 24985 - Accuracy: 0.974105
INFO] update 24986 - Accuracy: 0.974107
INFO] update 24987 - Accuracy: 0.974108
INFO] update 24988 - Accuracy: 0.974109
INFO] update 24989 - Accuracy: 0.97411
INFO] update 24990 - Accuracy: 0.974111
INFO] update 24991 - Accuracy: 0.974112
INFO] update 24992 - Accuracy: 0.974113
INFO] update 24993 - Accuracy: 0.974114
INFO] update 24994 - Accuracy: 0.974115
INFO] update 24995 - Accuracy: 0.974116
INFO] update 24996 - Accuracy: 0.974117
INFO] update 24997 - Accuracy: 0.974118
INFO] update 24998 - Accuracy: 0.974119
INFO] update 24999 - Accuracy: 0.97412
[INFO] final - Accuracy: 0.97412
After only 21 samples our Logistic Regression model is obtaining 76.19% accuracy.
Letting the model train on all 25,000 samples, we reach 97.412% accuracy which is quite respectable. The process took 6hr48m on my system.
Again, the key point here is that our Logistic Regression model was trained in an incremental fashion — we were not required to store the entire dataset in memory at once. Instead, we could train our Logistic Regression classifier one sample at a time.
Summary
In this tutorial, you learned how to perform online/incremental learning with Keras and the Creme machine learning library.
Using Keras and ResNet50 pre-trained on ImageNet, we applied transfer learning to extract features from the Dogs vs. Cats dataset.
We have a total of 25,000 images in the Dogs vs. Cats dataset. The output volume of ResNet50 is 7 x 7 x 2048 = 100,352-dim. Assuming 32-bit floats for our 100,352-dim feature vectors, that implies that trying to store the entire dataset in memory at once would require 10.03GB of RAM.
Not all machine learning practitioners will have that much RAM on their machines.
And more to the point — even if you do have sufficient RAM for this dataset, you will eventually encounter a dataset that exceeds the physical memory on your machine.
When that occasion arises you should apply online/incremental learning.
Using the Creme library we trained a multi-class Logistic Regression classifier one sample at a time, enabling us to obtain 97.412% accuracy on the Dogs vs. Cats dataset.
I hope you enjoyed today’s tutorial!
Feel free to use the code in this blog post as a starting point for your own projects where online/incremental learning is required.
To download the source code to this post, and be notified when future tutorials are published here on PyImageSearch, just enter your email address in the form below!
Downloads:
The post Online/Incremental Learning with Keras and Creme appeared first on PyImageSearch.