
In today’s tutorial, you’ll learn how to stream live video over a network with OpenCV. Specifically, you’ll learn how to implement Python + OpenCV scripts to capture and stream video frames from a camera to a server.
Every week or so I receive a comment on a blog post or a question over email that goes something like this:
Hi Adrian, I’m working on a project where I need to stream frames from a client camera to a server for processing using OpenCV. Should I use an IP camera? Would a Raspberry Pi work? What about RTSP streaming? Have you tried using FFMPEG or GStreamer? How do you suggest I approach the problem?
It’s a great question — and if you’ve ever attempted live video streaming with OpenCV then you know there are a ton of different options.
You could go with the IP camera route. But IP cameras can be a pain to work with. Some IP cameras don’t even allow you to access the RTSP (Real-time Streaming Protocol) stream. Other IP cameras simply don’t work with OpenCV’s
cv2.VideoCapturefunction. An IP camera may be too expensive for your budget as well.
In those cases, you are left with using a standard webcam — the question then becomes, how do you stream the frames from that webcam using OpenCV?
Using FFMPEG or GStreamer is definitely an option. But both of those can be a royal pain to work with.
Today I am going to show you my preferred solution using message passing libraries, specifically ZMQ and ImageZMQ, the latter of which was developed by PyImageConf 2018 speaker, Jeff Bass. Jeff has put a ton of work into ImageZMQ and his efforts really shows.
As you’ll see, this method of OpenCV video streaming is not only reliable but incredibly easy to use, requiring only a few lines of code.
To learn how to perform live network video streaming with OpenCV, just keep reading!
Looking for the source code to this post?
Jump right to the downloads section.
Live video streaming over network with OpenCV and ImageZMQ
In the first part of this tutorial, we’ll discuss why, and under which situations, we may choose to stream video with OpenCV over a network.
From there we’ll briefly discuss message passing along with ZMQ, a library for high performance asynchronous messaging for distributed systems.
We’ll then implement two Python scripts:
- A client that will capture frames from a simple webcam
- And a server that will take the input frames and run object detection on them
Will be using Raspberry Pis as our clients to demonstrate how cheaper hardware can be used to build a distributed network of cameras capable of piping frames to a more powerful machine for additional processing.
By the end of this tutorial, you’ll be able to apply live video streaming with OpenCV to your own applications!
Why stream videos/frames over a network?
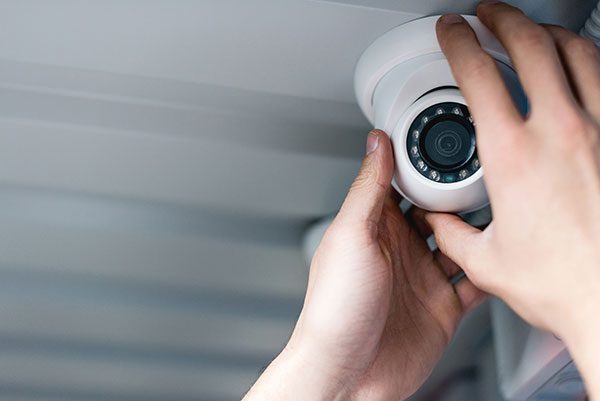
Figure 1: A great application of video streaming with OpenCV is a security camera system. You could use Raspberry Pis and a library called ImageZMQ to stream from the Pi (client) to the server.
There are a number of reasons why you may want to stream frames from a video stream over a network with OpenCV.
To start, you could be building a security application that requires all frames to be sent to a central hub for additional processing and logging.
Or, your client machine may be highly resource constrained (such as a Raspberry Pi) and lack the necessary computational horsepower required to run computationally expensive algorithms (such as deep neural networks, for example).
In these cases, you need a method to take input frames captured from a webcam with OpenCV and then pipe them over the network to another system.
There are a variety of methods to accomplish this task (discussed in the introduction of the post), but today we are going to specifically focus on message passing.
What is message passing?
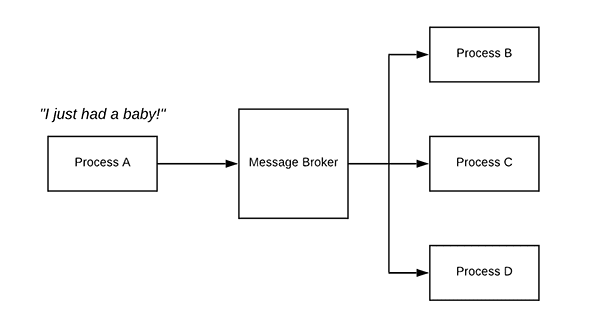
Figure 2: The concept of sending a message from a process, through a message broker, to other processes. With this method/concept, we can stream video over a network using OpenCV and ZMQ with a library called ImageZMQ.
Message passing is a programming paradigm/concept typically used in multiprocessing, distributed, and/or concurrent applications.
Using message passing, one process can communicate with one or more other processes, typically using a message broker.
Whenever a process wants to communicate with another process, including all other processes, it must first send its request to the message broker.
The message broker receives the request and then handles sending the message to the other process(es).
If necessary, the message broker also sends a response to the originating process.
As an example of message passing let’s consider a tremendous life event, such as a mother giving birth to a newborn child (process communication depicted in Figure 2 above). Process A, the mother, wants to announce to all other processes (i.e., the family), that she had a baby. To do so, Process A constructs the message and sends it to the message broker.
The message broker then takes that message and broadcasts it to all processes.
All other processes then receive the message from the message broker.
These processes want to show their support and happiness to Process A, so they construct a message saying their congratulations:
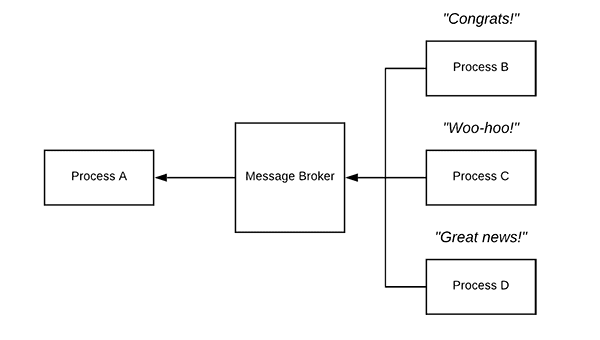
Figure 3: Each process sends an acknowledgment (ACK) message back through the message broker to notify Process A that the message is received. The ImageZMQ video streaming project by Jeff Bass uses this approach.
These responses are sent to the message broker which in turn sends them back to Process A (Figure 3).
This example is a dramatic simplification of message passing and message broker systems but should help you understand the general algorithm and the type of communication the processes are performing.
You can very easily get into the weeds studying these topics, including various distributed programming paradigms and types of messages/communication (1:1 communication, 1:many, broadcasts, centralized, distributed, broker-less etc.).
As long as you understand the basic concept that message passing allows processes to communicate (including processes on different machines) then you will be able to follow along with the rest of this post.
What is ZMQ?

Figure 4: The ZMQ library serves as the backbone for message passing in the ImageZMQ library. ImageZMQ is used for video streaming with OpenCV. Jeff Bass designed it for his Raspberry Pi network at his farm.
ZeroMQ, or simply ZMQ for short, is a high-performance asynchronous message passing library used in distributed systems.
Both RabbitMQ and ZeroMQ are some of the most highly used message passing systems.
However, ZeroMQ specifically focuses on high throughput and low latency applications — which is exactly how you can frame live video streaming.
When building a system to stream live videos over a network using OpenCV, you would want a system that focuses on:
- High throughput: There will be new frames from the video stream coming in quickly.
- Low latency: As we’ll want the frames distributed to all nodes on the system as soon as they are captured from the camera.
ZeroMQ also has the benefit of being extremely easy to both install and use.
Jeff Bass, the creator of ImageZMQ (which builds on ZMQ), chose to use ZMQ as the message passing library for these reasons — and I couldn’t agree with him more.
The ImageZMQ library
Figure 5: The ImageZMQ library is designed for streaming video efficiently over a network. It is a Python package and integrates with OpenCV.
Jeff Bass is the owner of Yin Yang Ranch, a permaculture farm in Southern California. He was one of the first people to join PyImageSearch Gurus, my flagship computer vision course. In the course and community he has been an active participant in many discussions around the Raspberry Pi.
Jeff has found that Raspberry Pis are perfect for computer vision and other tasks on his farm. They are inexpensive, readily available, and astoundingly resilient/reliable.
At PyImageConf 2018 Jeff spoke about his farm and more specifically about how he used Raspberry Pis and a central computer to manage data collection and analysis.
The heart of his project is a library that he put together called ImageZMQ.
ImageZMQ solves the problem of real-time streaming from the Raspberry Pis on his farm. It is based on ZMQ and works really well with OpenCV.
Plain and simple, it just works. And it works really reliably.
I’ve found it to be more reliable than alternatives such as GStreamer or FFMPEG streams. I’ve also had better luck with it than using RTSP streams.
You can learn the details of ImageZMQ by studying Jeff’s code on GitHub.
Jeff’s slides from PyImageConf 2018 are also available here.
In a few days, I’ll be posting my interview with Jeff Bass on the blog as well.
Let’s configure our clients and server with ImageZMQ and put it them to work!
Configuring your system and installing required packages
Figure 6: To install ImageZMQ for video streaming, you’ll need Python, ZMQ, and OpenCV.
Installing ImageZMQ is quite easy.
First, let’s pip install a few packages into your Python virtual environment (assuming you’re using one):
$ workon <env_name> # my environment is named py3cv4
$ pip install opencv-contrib-python
$ pip install zmq
$ pip install imutils
From there, clone the
imagezmqrepo:
$ cd ~
$ git clone https://github.com/jeffbass/imagezmq.git
You may then (1) copy or (2) sym-link the source directory into your virtual environment site-packages.
Let’s go with the sym-link option:
$ cd ~/.virtualenvs/lib/python3.5/site-packages
$ ln -s ~/imagezmq/imagezmq imagezmq
As a third alternative to the two options discussed, you may place
imagezmqinto each project folder in which you plan to use it.
Preparing clients for ImageZMQ
ImageZMQ must be installed on each client and the central server.
In this section, we’ll cover one important difference for clients.
Our code is going to use the hostname of the client to identify it. You could use the IP address in a string for identification, but setting a client’s hostname allows you to more easily identify the purpose of the client.
In this example, we’ll assume you are using a Raspberry Pi running Raspbian. Of course, your client could run Windows Embedded, Ubuntu, macOS, etc., but since our demo uses Raspberry Pis, let’s learn how to change the hostname on the RPi.
To change the hostname on your Raspberry Pi, fire up a terminal (this could be over an SSH connection if you’d like).
Then run the
raspi-configcommand:
$ sudo raspi-config
You’ll be presented with this terminal screen:
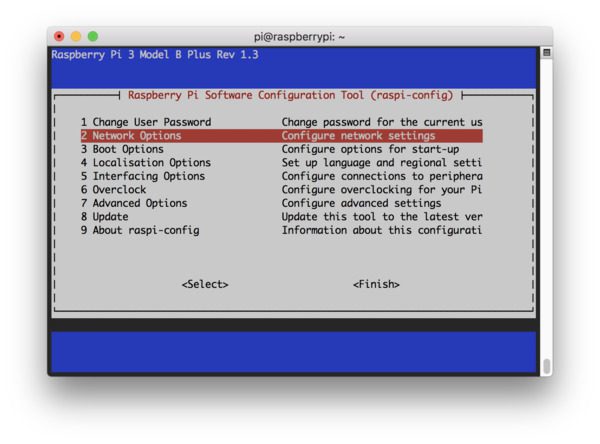
Figure 7: Configuring a Raspberry Pi hostname with raspi-config. Shown is the raspi-config home screen.
Navigate to “2 Network Options” and press enter.

Figure 8: Raspberry Pi raspi-config network settings page.
Then choose the option “N1 Hostname”.
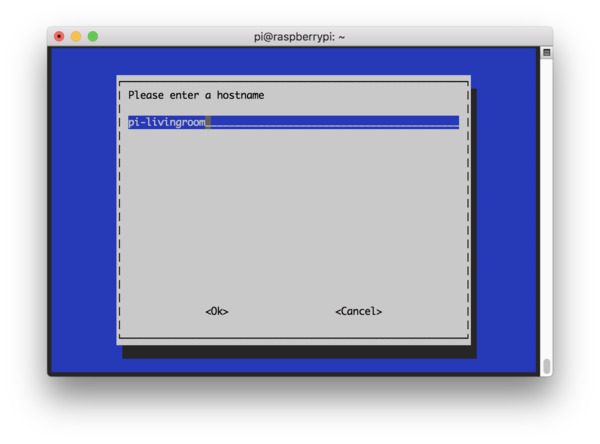
Figure 9: Setting the Raspberry Pi hostname to something easily identifiable/memorable. Our video streaming with OpenCV and ImageZMQ script will use the hostname to identify Raspberry Pi clients.
You can now change your hostname and select “<Ok>”.
You will be prompted to reboot — a reboot required.
I recommend naming your Raspberry Pis like this:
pi-location. Here are a few examples:
pi-garage
pi-frontporch
pi-livingroom
pi-driveway
- …you get the idea.
This way when you pull up your router page on your network, you’ll know what the Pi is for and its corresponding IP address. On some networks, you could even connect via SSH without providing the IP address like this:
$ ssh pi@pi-frontporch
As you can see, it will likely save some time later.
Defining the client and server relationship
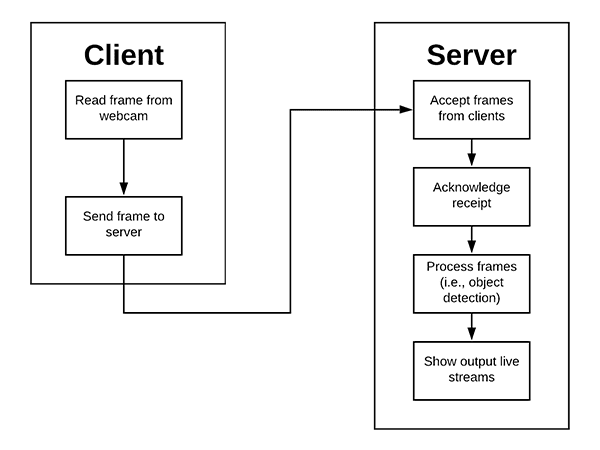
Figure 10: The client/server relationship for ImageZMQ video streaming with OpenCV.
Before we actually implement network video streaming with OpenCV, let’s first define the client/server relationship to ensure we’re on the same page and using the same terms:
- Client: Responsible for capturing frames from a webcam using OpenCV and then sending the frames to the server.
- Server: Accepts frames from all input clients.
You could argue back and forth as to which system is the client and which is the server.
For example, a system that is capturing frames via a webcam and then sending them elsewhere could be considered a server — the system is undoubtedly serving up frames.
Similarly, a system that accepts incoming data could very well be the client.
However, we are assuming:
- There are at least one (and likely many more) systems responsible for capturing frames.
- There is only a single system used for actually receiving and processing those frames.
For these reasons, I prefer to think of the system sending the frames as the client and the system receiving/processing the frames as the server.
You may disagree with me, but that is the client-server terminology we’ll be using throughout the remainder of this tutorial.
Project structure
Be sure to grab the “Downloads” for today’s project.
From there, unzip the files and navigate into the project directory.
You may use the
treecommand to inspect the structure of the project:
$ $ tree
.
├── MobileNetSSD_deploy.caffemodel
├── MobileNetSSD_deploy.prototxt
├── client.py
└── server.py

0 directories, 4 files
Note: If you’re going with the third alternative discussed above, then you would need to place the imagezmq
source directory in the project as well.
The first two files listed in the project are the pre-trained Caffe MobileNet SSD object detection files. The server (
server.py) will take advantage of these Caffe files using OpenCV’s DNN module to perform object detection.
The
client.pyscript will reside on each device which is sending a stream to the server. Later on, we’ll upload
client.pyonto each of the Pis (or another machine) on your network so they can send video frames to the central location.
Implementing the client OpenCV video streamer (i.e., video sender)
Let’s start by implementing the client which will be responsible for:
- Capturing frames from the camera (either USB or the RPi camera module)
- Sending the frames over the network via ImageZMQ
Open up the
client.pyfile and insert the following code:
# import the necessary packages
from imutils.video import VideoStream
import imagezmq
import argparse
import socket
import time

# construct the argument parser and parse the arguments
ap = argparse.ArgumentParser()
ap.add_argument("-s", "--server-ip", required=True,
	help="ip address of the server to which the client will connect")
args = vars(ap.parse_args())

# initialize the ImageSender object with the socket address of the
# server
sender = imagezmq.ImageSender(connect_to="tcp://{}:5555".format(
	args["server_ip"]))
We start off by importing packages and modules on Lines 2-6:
- Pay close attention here to see that we’re importing
imagezmq
in our client-side script. VideoStream
will be used to grab frames from our camera.- Our
argparse
import will be used to process a command line argument containing the server’s IP address (--server-ip
is parsed on Lines 9-12). - The
socket
module of Python is simply used to grab the hostname of the Raspberry Pi. - Finally,
time
will be used to allow our camera to warm up prior to sending frames.
Lines 16 and 17 simply create the
imagezmq
senderobject and specify the IP address and port of the server. The IP address will come from the command line argument that we already established. I’ve found that port
5555doesn’t usually have conflicts, so it is hardcoded. You could easily turn it into a command line argument if you need to as well.
Let’s initialize our video stream and start sending frames to the server:
# get the host name, initialize the video stream, and allow the
# camera sensor to warmup
rpiName = socket.gethostname()
vs = VideoStream(usePiCamera=True).start()
#vs = VideoStream(src=0).start()
time.sleep(2.0)

while True:
	# read the frame from the camera and send it to the server
	frame = vs.read()
	sender.send_image(rpiName, frame)
Now, we’ll grab the hostname, storing the value as
rpiName(Line 21). Refer to “Preparing clients for ImageZMQ” above to set your hostname on a Raspberry Pi.
From there, our
VideoStreamobject is created to connect grab frames from our PiCamera. Alternatively, you can use any USB camera connected to the Pi by commenting Line 22 and uncommenting Line 23.
This is the point where you should also set your camera resolution. We are just going to use the maximum resolution so the argument is not provided. But if you find that there is a lag, you are likely sending too many pixels. If that is the case, you may reduce your resolution quite easily. Just pick from one of the resolutions available for the PiCamera V2 here: PiCamera ReadTheDocs. The second table is for V2.
Once you’ve chosen the resolution, edit Line 22 like this:
vs = VideoStream(usePiCamera=True, resolution=(320, 240)).start()
Note: The resolution argument won’t make a difference for USB cameras since they are all implemented differently. As an alternative, you can insert a frame = imutils.resize(frame, width=320)
between Lines 28 and 29 to resize the frame
manually.
From there, a warmup sleep time of
2.0seconds is set (Line 24).
Finally, our
whileloop on Lines 26-29 grabs and sends the frames.
As you can see, the client is quite simple and straightforward!
Let’s move on to the actual server.
Implementing the OpenCV video server (i.e., video receiver)
The live video server will be responsible for:
- Accepting incoming frames from multiple clients.
- Applying object detection to each of the incoming frames.
- Maintaining an “object count” for each of the frames (i.e., count the number of objects).
Let’s go ahead and implement up the server — open up the
server.pyfile and insert the following code:
# import the necessary packages
from imutils import build_montages
from datetime import datetime
import numpy as np
import imagezmq
import argparse
import imutils
import cv2

# construct the argument parser and parse the arguments
ap = argparse.ArgumentParser()
ap.add_argument("-p", "--prototxt", required=True,
	help="path to Caffe 'deploy' prototxt file")
ap.add_argument("-m", "--model", required=True,
	help="path to Caffe pre-trained model")
ap.add_argument("-c", "--confidence", type=float, default=0.2,
	help="minimum probability to filter weak detections")
ap.add_argument("-mW", "--montageW", required=True, type=int,
	help="montage frame width")
ap.add_argument("-mH", "--montageH", required=True, type=int,
	help="montage frame height")
args = vars(ap.parse_args())
On Lines 2-8 we import packages and libraries. In this script, most notably we’ll be using:
build_montages
: To build a montage of all incoming frames.imagezmq
: For streaming video from clients. In our case, each client is a Raspberry Pi.imutils
: My package of OpenCV and other image processing convenience functions available on GitHub and PyPi.cv2
: OpenCV’s DNN module will be used for deep learning object detection inference.
Are you wondering where imutils.video.VideoStream
is? iWe usually use my
VideoStreamclass to read frames from a webcam. However, don’t forget that we’re using
imagezmqfor streaming frames from clients. The server doesn’t have a camera directly wired to it.
Let’s process five command line arguments with argparse:
--prototxt
: The path to our Caffe deep learning prototxt file.--model
: The path to our pre-trained Caffe deep learning model. I’ve provided MobileNet SSD in the “Downloads” but with some minor changes, you could elect to use an alternative model.--confidence
: Our confidence threshold to filter weak detections.--montageW
: This is not width in pixels. Rather this is the number of columns for our montage. We’re going to stream from four raspberry Pis today, so you could do 2×2, 4×1, or 1×4. You could also do, for example, 3×3 for nine clients, but 5 of the boxes would be empty.--montageH
: The number of rows for your montage. See the--montageW
explanation.
Let’s initialize our
ImageHubobject along with our deep learning object detector:
# initialize the ImageHub object
imageHub = imagezmq.ImageHub()

# initialize the list of class labels MobileNet SSD was trained to
# detect, then generate a set of bounding box colors for each class
CLASSES = ["background", "aeroplane", "bicycle", "bird", "boat",
	"bottle", "bus", "car", "cat", "chair", "cow", "diningtable",
	"dog", "horse", "motorbike", "person", "pottedplant", "sheep",
	"sofa", "train", "tvmonitor"]

# load our serialized model from disk
print("[INFO] loading model...")
net = cv2.dnn.readNetFromCaffe(args["prototxt"], args["model"])
Our server needs an
ImageHubto accept connections from each of the Raspberry Pis. It essentially uses sockets and ZMQ for receiving frames across the network (and sending back acknowledgments).
Our MobileNet SSD object
CLASSESare specified on Lines 29-32. If you aren’t familiar with the MobileNet Single Shot Detector, please refer to this blog post or Deep Learning for Computer Vision with Python.
From there we’ll instantiate our Caffe object detector on Line 36.
Initializations come next:
# initialize the consider set (class labels we care about and want
# to count), the object count dictionary, and the frame  dictionary
CONSIDER = set(["dog", "person", "car"])
objCount = {obj: 0 for obj in CONSIDER}
frameDict = {}

# initialize the dictionary which will contain  information regarding
# when a device was last active, then store the last time the check
# was made was now
lastActive = {}
lastActiveCheck = datetime.now()

# stores the estimated number of Pis, active checking period, and
# calculates the duration seconds to wait before making a check to
# see if a device was active
ESTIMATED_NUM_PIS = 4
ACTIVE_CHECK_PERIOD = 10
ACTIVE_CHECK_SECONDS = ESTIMATED_NUM_PIS * ACTIVE_CHECK_PERIOD

# assign montage width and height so we can view all incoming frames
# in a single "dashboard"
mW = args["montageW"]
mH = args["montageH"]
print("[INFO] detecting: {}...".format(", ".join(obj for obj in
	CONSIDER)))
In today’s example, I’m only going to
CONSIDERthree types of objects from the MobileNet SSD list of
CLASSES. We’re considering (1) dogs, (2) persons, and (3) cars on Line 40.
We’ll soon use this
CONSIDERset to filter out other classes that we don’t care about such as chairs, plants, monitors, or sofas which don’t typically move and aren’t interesting for this security type project.
Line 41 initializes a dictionary for our object counts to be tracked in each video feed. Each count is initialized to zero.
A separate dictionary,
frameDictis initialized on Line 42. The
frameDictdictionary will contain the hostname key and the associated latest frame value.
Lines 47 and 48 are variables which help us determine when a Pi last sent a frame to the server. If it has been a while (i.e. there is a problem), we can get rid of the static, out of date image in our montage. The
lastActivedictionary will have hostname keys and timestamps for values.
Lines 53-55 are constants which help us to calculate whether a Pi is active. Line 55 itself calculates that our check for activity will be
40seconds. You can reduce this period of time by adjusting
ESTIMATED_NUM_PISand
ACTIVE_CHECK_PERIODon Lines 53 and 54.
Our
mWand
mHvariables on Lines 59 and 60 represent the width and height (columns and rows) for our montage. These values are pulled directly from the command line
argsdictionary.
Let’s loop over incoming streams from our clients and processing the data!
# start looping over all the frames
while True:
	# receive RPi name and frame from the RPi and acknowledge
	# the receipt
	(rpiName, frame) = imageHub.recv_image()
	imageHub.send_reply(b'OK')

	# if a device is not in the last active dictionary then it means
	# that its a newly connected device
	if rpiName not in lastActive.keys():
		print("[INFO] receiving data from {}...".format(rpiName))

	# record the last active time for the device from which we just
	# received a frame
	lastActive[rpiName] = datetime.now()
We begin looping on Line 65.
Lines 68 and 69 grab an image from the
imageHuband send an ACK message. The result of
imageHub.recv_imageis
rpiName, in our case the hostname, and the video
frameitself.
It is really as simple as that to receive frames from an ImageZMQ video stream!
Lines 73-78 perform housekeeping duties to determine when a Raspberry Pi was
lastActive.
Let’s perform inference on a given incoming
frame:
# resize the frame to have a maximum width of 400 pixels, then
	# grab the frame dimensions and construct a blob
	frame = imutils.resize(frame, width=400)
	(h, w) = frame.shape[:2]
	blob = cv2.dnn.blobFromImage(cv2.resize(frame, (300, 300)),
		0.007843, (300, 300), 127.5)

	# pass the blob through the network and obtain the detections and
	# predictions
	net.setInput(blob)
	detections = net.forward()

	# reset the object count for each object in the CONSIDER set
	objCount = {obj: 0 for obj in CONSIDER}
Lines 82-90 perform object detection on the
frame:
- The
frame
dimensions are computed. - A
blob
is created from the image (see this post for more details about how OpenCV’s blobFromImage function works). - The
blob
is passed through the neural net.
From there, on Line 93 we reset the object counts to zero (we will be populating the dictionary with fresh count values shortly).
Let’s loop over the detections with the goal of (1) counting, and (2) drawing boxes around objects that we are considering:
# loop over the detections
	for i in np.arange(0, detections.shape[2]):
		# extract the confidence (i.e., probability) associated with
		# the prediction
		confidence = detections[0, 0, i, 2]

		# filter out weak detections by ensuring the confidence is
		# greater than the minimum confidence
		if confidence > args["confidence"]:
			# extract the index of the class label from the
			# detections
			idx = int(detections[0, 0, i, 1])

			# check to see if the predicted class is in the set of
			# classes that need to be considered
			if CLASSES[idx] in CONSIDER:
				# increment the count of the particular object
				# detected in the frame
				objCount[CLASSES[idx]] += 1

				# compute the (x, y)-coordinates of the bounding box
				# for the object
				box = detections[0, 0, i, 3:7] * np.array([w, h, w, h])
				(startX, startY, endX, endY) = box.astype("int")

				# draw the bounding box around the detected object on
				# the frame
				cv2.rectangle(frame, (startX, startY), (endX, endY),
					(255, 0, 0), 2)
On Line 96 we begin looping over each of the
detections. Inside the loop, we proceed to:
- Extract the object
confidence
and filter out weak detections (Lines 99-103). - Grab the label
idx
(Line 106) and ensure that the label is in theCONSIDER
set (Line 110). For each detection that has passed the two checks (confidence
threshold and inCONSIDER
), we will:- Increment the
objCount
for the respective object (Line 113). - Draw a
rectangle
around the object (Lines 117-123).
- Increment the
Next, let’s annotate each frame with the hostname and object counts. We’ll also build a montage to display them in:
# draw the sending device name on the frame
	cv2.putText(frame, rpiName, (10, 25),
		cv2.FONT_HERSHEY_SIMPLEX, 0.5, (0, 0, 255), 2)

	# draw the object count on the frame
	label = ", ".join("{}: {}".format(obj, count) for (obj, count) in
		objCount.items())
	cv2.putText(frame, label, (10, h - 20),
		cv2.FONT_HERSHEY_SIMPLEX, 0.5, (0, 255,0), 2)

	# update the new frame in the frame dictionary
	frameDict[rpiName] = frame

	# build a montage using images in the frame dictionary
	montages = build_montages(frameDict.values(), (w, h), (mW, mH))

	# display the montage(s) on the screen
	for (i, montage) in enumerate(montages):
		cv2.imshow("Home pet location monitor ({})".format(i),
			montage)

	# detect any kepresses
	key = cv2.waitKey(1) & 0xFF
On Lines 126-133 we make two calls to
cv2.putTextto draw the Raspberry Pi hostname and object counts.
From there we update our
frameDictwith the
framecorresponding to the RPi hostname.
Lines 139-144 create and display a montage of our client frames. The montage will be
mWframes wide and
mHframes tall.
Keypresses are captured via Line 147.
The last block is responsible for checking our
lastActivetimestamps for each client feed and removing frames from the montage that have stalled. Let’s see how it works:
# if current time *minus* last time when the active device check
	# was made is greater than the threshold set then do a check
	if (datetime.now() - lastActiveCheck).seconds > ACTIVE_CHECK_SECONDS:
		# loop over all previously active devices
		for (rpiName, ts) in list(lastActive.items()):
			# remove the RPi from the last active and frame
			# dictionaries if the device hasn't been active recently
			if (datetime.now() - ts).seconds > ACTIVE_CHECK_SECONDS:
				print("[INFO] lost connection to {}".format(rpiName))
				lastActive.pop(rpiName)
				frameDict.pop(rpiName)

		# set the last active check time as current time
		lastActiveCheck = datetime.now()

	# if the `q` key was pressed, break from the loop
	if key == ord("q"):
		break

# do a bit of cleanup
cv2.destroyAllWindows()
There’s a lot going on in Lines 151-162. Let’s break it down:
- We only perform a check if at least
ACTIVE_CHECK_SECONDS
have passed (Line 151). - We loop over each key-value pair in
lastActive
(Line 153):- If the device hasn’t been active recently (Line 156) we need to remove data (Lines 158 and 159). First we remove (
pop
) therpiName
and timestamp fromlastActive
. Then therpiName
and frame are removed from theframeDict
.
- If the device hasn’t been active recently (Line 156) we need to remove data (Lines 158 and 159). First we remove (
- The
lastActiveCheck
is updated to the current time on Line 162.
Effectively this will help us get rid of expired frames (i.e. frames that are no longer real-time). This is really important if you are using the ImageHub server for a security application. Perhaps you are saving key motion events like a Digital Video Recorder (DVR). The worst thing that could happen if you don’t get rid of expired frames is that an intruder kills power to a client and you don’t realize the frame isn’t updating. Think James Bond or Jason Bourne sort of spy techniques.
Last in the loop is a check to see if the
"q"key has been pressed — if so we
breakfrom the loop and destroy all active montage windows (Lines 165-169).
Streaming video over network with OpenCV
Now that we’ve implemented both the client and the server, let’s put them to the test.
Make sure you use the “Downloads” section of this post to download the source code.
From there, upload the client to each of your Pis using SCP:
$ scp client.py pi@192.168.1.10:~
$ scp client.py pi@192.168.1.11:~
$ scp client.py pi@192.168.1.12:~
$ scp client.py pi@192.168.1.13:~
In this example, I’m using four Raspberry Pis, but four aren’t required — you can use more or less. Be sure to use applicable IP addresses for your network.
You also need to follow the installation instructions to install ImageZMQ on each Raspberry Pi. See the “Configuring your system and installing required packages” section in this blog post.
Before we start the clients, we must start the server. Let’s fire it up with the following command:
$ python server.py --prototxt MobileNetSSD_deploy.prototxt \
	--model MobileNetSSD_deploy.caffemodel --montageW 2 --montageH 2
Once your server is running, go ahead and start each client pointing to the server. Here is what you need to do on each client, step-by-step:
- Open an SSH connection to the client:
ssh pi@192.168.1.10
- Start screen on the client:
screen
- Source your profile:
source ~/.profile
- Activate your environment:
workon py3cv4
- Install ImageZMQ using instructions in “Configuring your system and installing required packages”.
- Run the client:
python client.py --server-ip 192.168.1.5
As an alternative to these steps, you may start the client script on reboot.
Automagically, your server will start bringing in frames from each of your Pis. Each frame that comes in is passed through the MobileNet SSD. Here’s a quick demo of the result:
A full video demo can be seen below:
What’s next?
Is your brain spinning with new Raspberry Pi project ideas right now?
The Raspberry Pi is my favorite community driven product for Computer Vision, IoT, and Edge Computing.
The possibilities with the Raspberry Pi are truly endless:
- Maybe you have a video streaming idea based on this post.
- Or perhaps you want to learn about deep learning with the Raspberry Pi.
- Interested in robotics? Why not build a small computer vision-enabled robot or self-driving RC car?
- Face recognition, classroom attendance, and security? All possible.
I’ve been so excited about the Raspberry Pi that I decided to write a book with over 40 practical, hands-on chapters that you’ll be able to learn from and hack with.
Inside the book, I’ll be sharing my personal tips and tricks for working with the Raspberry Pi (you can apply them to other resource-constrained devices too). You can view the full Raspberry Pi for Computer Vision table of contents here.
The book is currently in development. That said, you can reserve your copy by pre-ordering now and get a great deal on my other books/courses.
The pre-order sale ends on Friday, May 10th, 2019 at 10:00AM EDT. Don’t miss out on these huge savings!
Summary
In this tutorial, you learned how to stream video over a network using OpenCV and the ImageZMQ library.
Instead of relying on IP cameras or FFMPEG/GStreamer, we used a simple webcam and a Raspberry Pi to capture input frames and then stream them to a more powerful machine for additional processing using a distributed system concept called message passing.
Thanks to Jeff Bass’ hard work (the creator of ImageZMQ) our implementation required only a few lines of code.
If you are ever in a situation where you need to stream live video over a network, definitely give ImageZMQ a try — I think you’ll find it super intuitive and easy to use.
I’ll be back in a few days with an interview with Jeff Bass as well!
To download the source code to this post, and be notified when future tutorials are published here on PyImageSearch, just enter your email address in the form below!
Downloads:
The post Live video streaming over network with OpenCV and ImageZMQ appeared first on PyImageSearch.