
Inside this tutorial, you will learn how to configure macOS Mojave for deep learning.
After you’ve gone through this tutorial, your macOS Mojave system will be ready for (1) deep learning with Keras and TensorFlow, and (2) ready for Deep Learning for Computer Vision with Python.
A tutorial on configuring Mojave has been a long time coming on my blog since the Mojave OS was officially released in September 2018.
The OS was plagued with problems from the get-go, and I decided to hold off. I’m still actually running High Sierra on my machines, but after putting this guide together I feel confident in recommending Mojave to PyImageSearch readers.
Apple has fixed most of the bugs, but as you’ll see in this guide, Homebrew (an unofficial package manager for macOS) doesn’t make everything especially easy.
If you’re ready with a fresh install of macOS Mojave and are up for today’s challenge, let’s get started configuring your system for deep learning.
Also released today is my Ubuntu 18.04 deep learning configuration guide with optional GPU support. Be sure to check it out!
To learn how to configure macOS for deep learning and computer vision with Python, just keep reading.
macOS Mojave: Install TensorFlow and Keras for Deep Learning
Inside of this tutorial, we’ll review the seven steps to configuring Mojave for deep learning.
Inside of Step #3, we’ll do some Homebrew formulae kung fu to get Python 3.6 installed.
You see, Homebrew now by default installs Python 3.7.
This presents a challenge to us in the deep learning community because Tensorflow does not yet officially support Python 3.7.
The TensorFlow team is definitely working on Python 3.7 support — but if you’re running macOS Mojave you probably don’t want to twiddle your thumbs and wait until Python 3.7 support is officially released.
If you’ve run into this conundrum, then my install guide is for you.
Let’s begin!
Step #1: Install and configure Xcode
For starters, you’ll need to get Xcode from the Apple App Store and install it. Don’t worry, it is 100% free.

Figure 1: Download Xcode for macOS Mojave prior to setting up your system for deep learning.
After Xcode has been downloaded and installed from the App Store, open a terminal and execute the following command to accept the developer license:
$ sudo xcodebuild -license
Press “enter” then scroll to the bottom with the “space” key and then type “agree”.
The next step is to install Apple command line tools:
$ sudo xcode-select --install
This will launch a window where you need to press “Install“. From there, you’ll have to accept another agreement (this time with a button). Finally, a download progress window will launch and you’ll need to wait a few minutes.
Step #2: Install Homebrew on macOS Mojave
Homebrew (also known as Brew), is a package manager for macOS. You may already have it on your system, but if you don’t you will want to follow the commands in this section to install it.
First, we’ll install Homebrew by copying and pasting the entire command into your terminal:
$ /usr/bin/ruby -e "$(curl -fsSL https://raw.githubusercontent.com/Homebrew/install/master/install)"
Next, we’ll update our package definitions:
$ brew update
Followed by updating your
~/.bash_profileusing the
nanoterminal editor (any other editor should do the trick as well):
$ nano ~/.bash_profile
Add the following lines to the file:
# Homebrew
export PATH=/usr/local/bin:$PATH

Figure 2: Editing the ~/.bash_profile to ensure that Homebrew is set up with your PATH. We will use Homebrew to install some of the tools on macOS Mojave for deep learning.
To save and close, press “ctrl + o” (save), then “enter” to keep the filename, and finally “ctrl + x” (exit).
Let’s reload our profile:
$ source ~/.bash_profile
Now that Brew is ready to go, let’s get Python 3.6 installed.
Step #3: Downgrade Python 3.7 to Python 3.6 on macOS Mojave
I have a love-hate relationship with Homebrew. I love how convenient it is and how the volunteer team supports so much software. They do a really great job. They’re always on top of their game supporting the latest software.
The problem with Mojave is that by default Homebrew will install Python 3.7, but 3.7 is not (yet) supported by TensorFlow.
Therefore, we need to do some Kung Fu to get Python 3.6 installed on Mojave.
If you try to install Python 3.6 directly, you’ll encounter this problem:
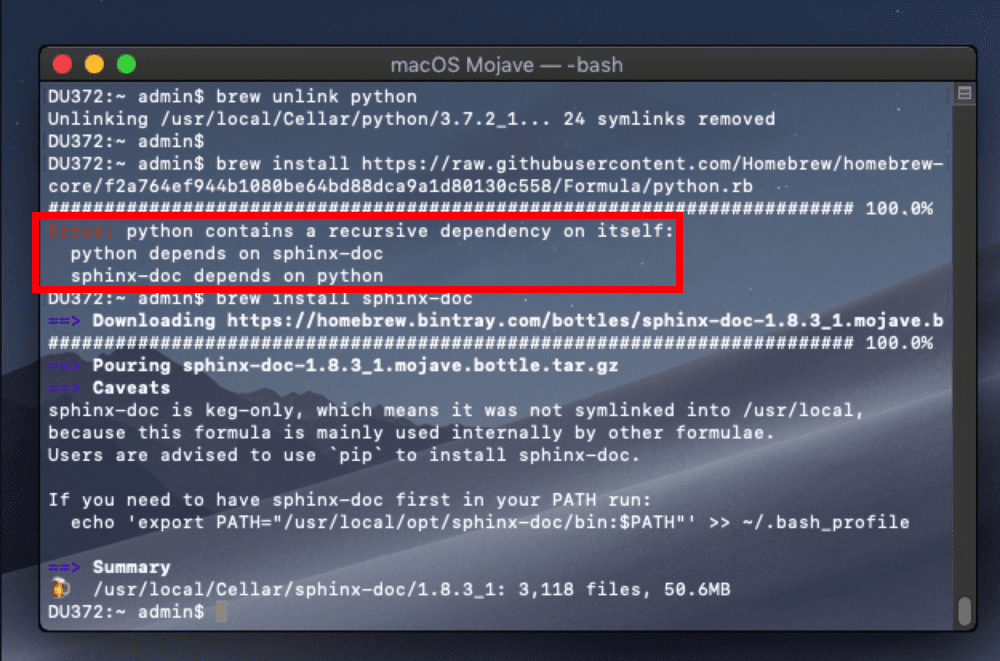
Figure 3: The sphinx-doc + Python 3.7 circular dependency causes issues with installing Python 3.6 on macOS Mojave.
The problem is that
sphinx-docdepends on Python 3.7, and Python 3.6.5 depends on
sphinx-docwhich depends on Python 3.7.
Reading that sentence may give you a headache, but I think you get the point that we have a circular dependency problem.
Note: The following steps worked for me and I tested them twice on two fresh instances of Mojave. If you know of an improved way to install Python 3.6, please let me and the community know in the comments.
Let’s take steps to fix the circular dependency issue.
First, install Python (this installs Python 3.7 which we will later downgrade):
$ brew install python3
Now we need to remove the circular dependency.
Let’s go ahead and edit the Homebrew formulae for
sphinx-docas that is where the problem lies:
$ nano /usr/local/Homebrew/Library/Taps/homebrew/homebrew-core/Formula/sphinx-doc.rb
Now scroll down and remove the Python dependency by placing a
#in front of it to comment it out:
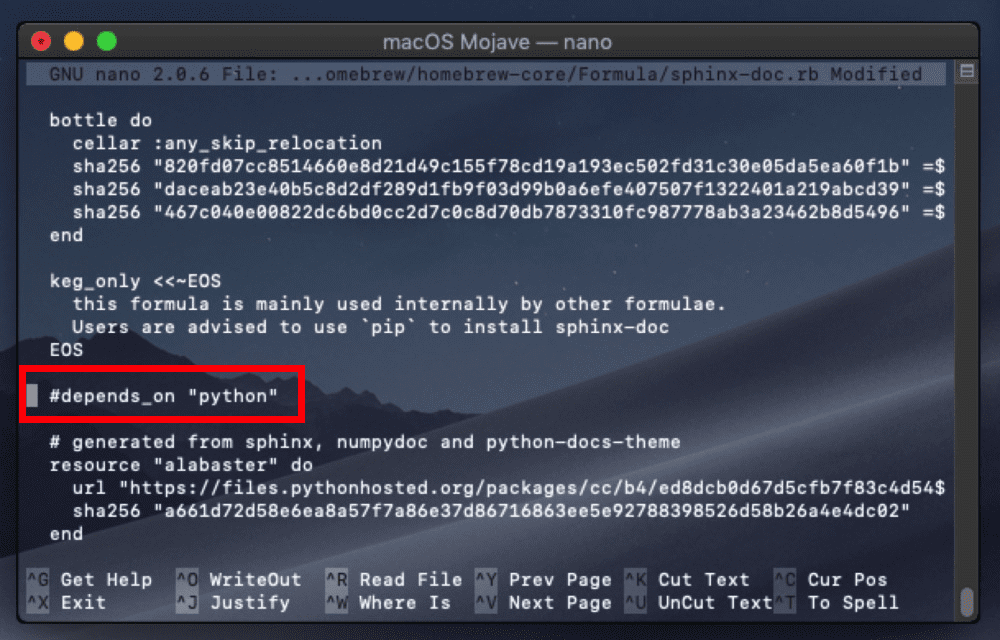
Figure 4: Removing the sphinx-doc dependency on Python 3.7. This will ultimately allow us to install Python 3.6 on macOS Mojave for deep learning.
Once you’ve added the
#to comment this line out, go ahead and save + exit.
From there, just reinstall sphinx-doc:
$ brew reinstall sphinx-doc
Now it is time to install Python 3.6.5.
The first step is to unlink Python:
$ brew unlink python
And from there we can actually install Python 3.6:
$ brew install https://raw.githubusercontent.com/Homebrew/homebrew-core/f2a764ef944b1080be64bd88dca9a1d80130c558/Formula/python.rb
From here you should check which Python is being used by querying the version:
$ which python3
/usr/local/bin/python3
$ python3 --version
Python 3.6.5
Inspect the output of the first command ensuring that you see
local/in between
/usr/and
bin/python3.
As our output indicates, we are now using Python 3.6.5!
Step #4: Install brew packages for OpenCV on macOS Mojave
The following tools need to be installed for compilation, image I/O, and optimization:
$ brew install cmake pkg-config wget
$ brew install jpeg libpng libtiff openexr
$ brew install eigen tbb hdf5
After those packages are installed we’re ready to create our Python virtual environment.
Step #5: Create your Python virtual environment in macOS Mojave
As I’ve stated in other install guides on this site, virtual environments are definitely the way to go when working with Python, enabling you to accommodate different versions in sandboxed environments.
If you mess up an environment, you can simply delete the environment and rebuild it, without affecting other Python virtual environments.
Let’s install virtualenv and virtualenvwrapper via
pip:
$ pip3 install virtualenv virtualenvwrapper
From there, we’ll update our
~/.bash_profileagain:
$ nano ~/.bash_profile
Where we’ll add the following lines to the file:
# virtualenv and virtualenvwrapper
export WORKON_HOME=$HOME/.virtualenvs
export VIRTUALENVWRAPPER_PYTHON=/usr/local/bin/python3
source /usr/local/bin/virtualenvwrapper.sh
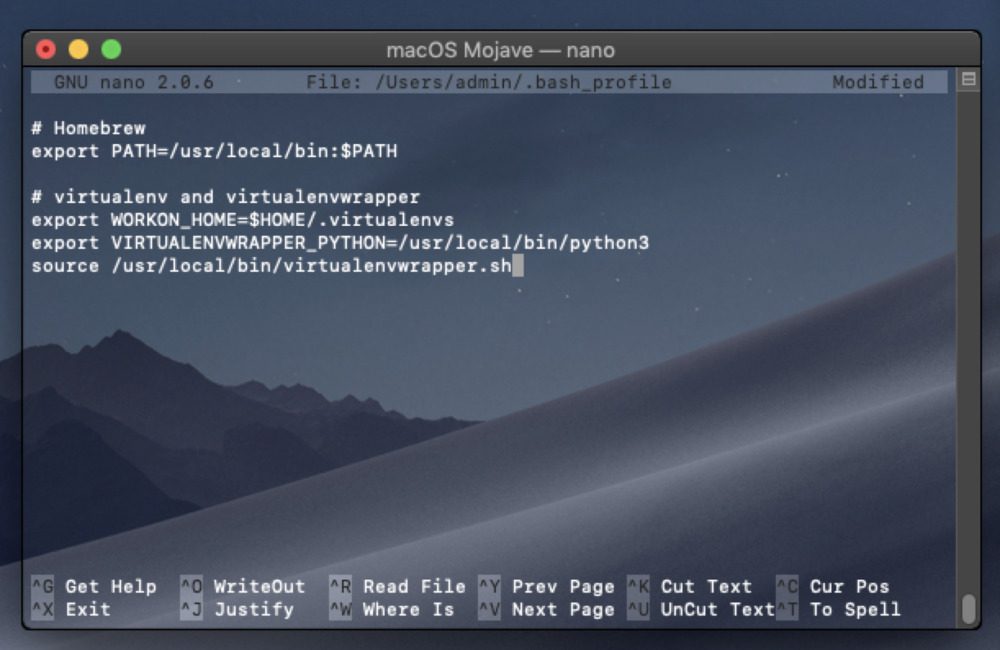
Figure 5: Editing the ~/.bash_profile again, this time to accommodate virtualenv and virtualenvwrapper tools for Python virtual environments.
Followed by reloading the profile:
$ source ~/.bash_profile
Check for any errors in the terminal output. If
virtualenvwrapperand Python 3.6 are playing nice together, you should be ready to create a new virtual environment.
Creating the dl4cv virtual environment on macOS Mojave
The
dl4cvenvironment will house TensorFlow, Keras, OpenCV and all other associated Python packages for my deep learning book. You can of course name the environment whatever you want, but from here on we’ll be referring to it as
dl4cv.
To create the
dl4cvenvironment with Python 3 simply enter the following command:
$ mkvirtualenv dl4cv -p python3
After Python 3 and supporting scripts are installed into the new environment, you should actually be inside the environment. This is denoted by
(dl4cv)at the beginning of your bash prompt as shown in the figure below:

Figure 6: The workon command allows us to activate a Python virtual environment of our choice. In this case, I’m activating the dl4cv environment on macOS Mojave for deep learning.
If you do not see the modified bash prompt then you can enter the following command at any time to enter the environment at any time:
$ workon dl4cv
Just to be on the safe side, let’s check which Python our environment is using and query the version once again:
$ workon dl4cv
$ which python
/Users/admin/.virtualenvs/dl4cv/bin/python
$ python --version
Python 3.6.5
Notice that the python executable is in
~/.virtualenvs/dl4cv/bin/, our
dl4cvvirtual environment. Also triple check here that you’re using Python 3.6.5.
When you’re sure your virtual environment is properly configured with Python 3.6.5 it is safe to move on and install software into the environment.
Let’s continue to Step #6.
Step #6: Install OpenCV on macOS Mojave
We have two options for installing OpenCV for compatibility with my deep learning book.
The first method (Step #6a) is by using a precompiled binary available in the Python Package Index (where pip pulls from). The disadvantage is that the maintainer has chosen not to compile patented algorithms into the binary.
The second option (Step #6b) is to compile OpenCV from source. This method allows for full control over the compile including optimizations and patented algorithms (“nonfree”).
I recommend going with the first option if you are a beginner, constrained by time, or if you know you don’t need patented algorithms (DL4CV does not require the added functionality). The first option will require just 5 minutes.
Power users should go with the second option while allowing for about 40 to 60 minutes to compile.
Step #6a: Install OpenCV with pip
Ensure you’re working in the
dl4cvenvironment and then enter the
pip installcommand with the package name as shown:
$ workon dl4cv
$ pip install opencv-contrib-python
Note: If you require a specific version you can use the following syntax: pip install opencv-contrib-python==3.4.4
.
Congrats! You now have OpenCV installed.
From here you can skip to Step #7.
Step #6b: Compile and Install OpenCV
If you performed Step #6a you should skip this option and go to Step #7.
Let’s compile OpenCV from source.
The only Python dependency required by OpenCV is NumPy, which we can install via:
$ workon dl4cv
$ pip install numpy
First, let’s download the source code:
$ cd ~
$ wget -O opencv.zip https://github.com/opencv/opencv/archive/3.4.4.zip
$ wget -O opencv_contrib.zip https://github.com/opencv/opencv_contrib/archive/3.4.4.zip
Note: You can replace 3.4.4.zip
with 4.0.0.zip
or higher if you’d like to use a different version of OpenCV. Just make sure that both the opencv
and opencv_contrib
downloads are for the same version!
Next unpack the archives:
$ unzip opencv.zip
$ unzip opencv_contrib.zip
And rename the directories:
$ mv opencv-3.4.4 opencv
$ mv opencv_contrib-3.4.4 opencv_contrib
Note: Replace the folder name in the command with the one corresponding to your version of OpenCV.
To prepare our compilation process we use CMake.
It is very important that you copy the CMake command exactly as it appears here, taking care to copy and past the entire command; I would suggest clicking the “<>” button in the toolbar below to expand the entire command:
$ cd ~/opencv
$ mkdir build
$ cd build
$ cmake -D CMAKE_BUILD_TYPE=RELEASE \
    -D CMAKE_INSTALL_PREFIX=/usr/local \
    -D OPENCV_EXTRA_MODULES_PATH=~/opencv_contrib/modules \
    -D PYTHON3_LIBRARY=`python -c 'import subprocess ; import sys ; s = subprocess.check_output("python-config --configdir", shell=True).decode("utf-8").strip() ; (M, m) = sys.version_info[:2] ; print("{}/libpython{}.{}.dylib".format(s, M, m))'` \
    -D PYTHON3_INCLUDE_DIR=`python -c 'import distutils.sysconfig as s; print(s.get_python_inc())'` \
    -D PYTHON3_EXECUTABLE=$VIRTUAL_ENV/bin/python \
    -D BUILD_opencv_python2=OFF \
    -D BUILD_opencv_python3=ON \
    -D INSTALL_PYTHON_EXAMPLES=ON \
    -D INSTALL_C_EXAMPLES=OFF \
    -D OPENCV_ENABLE_NONFREE=ON \
    -D BUILD_EXAMPLES=ON ..
Note: For the above CMake command, I spent considerable time creating, testing, and refactoring it. I’m confident that it will save you time and frustration if you use it exactly as it appears. Make sure you click the “<>” button in the toolbar of the code block above to expand the code block. This will enable you to copy and paste the entire command.
Running CMake will take 2-5 minutes.
You should always inspect your CMake output for errors and to ensure your compile settings are set as intended.
Your output should be similar to the screenshots below which ensure that the correct Python 3 binary/library and NumPy version are utilized as well as “non-free algorithms” being on:
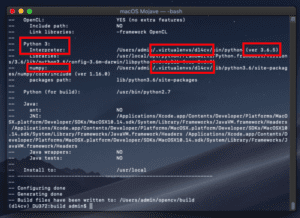
Figure 7: Inspecting OpenCV CMake output prior to installing deep learning frameworks on macOS.
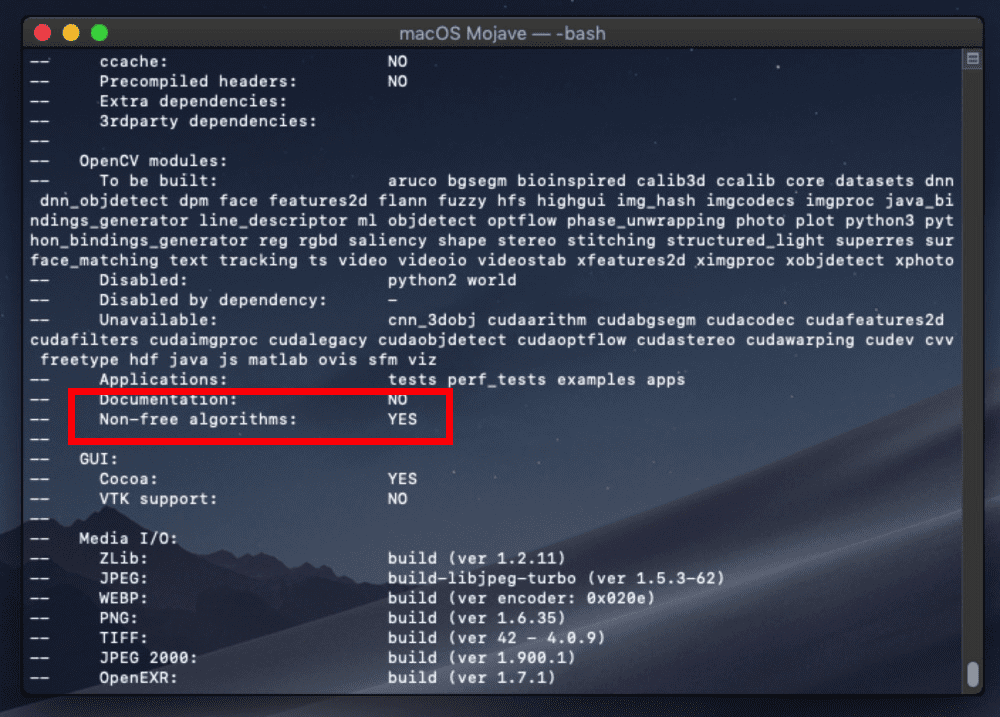
Figure 8: Ensuring that the OpenCV patented (“non-free”) algorithms are installed.
If your CMake output for OpenCV matches mine, then we’re ready to actually compile OpenCV:
$ make -j4
Note: Most macOS machines will have at least 4 cores/CPUs. You can (and should) edit the flag above with a number according to your system’s processing specs to speedup the compile process.
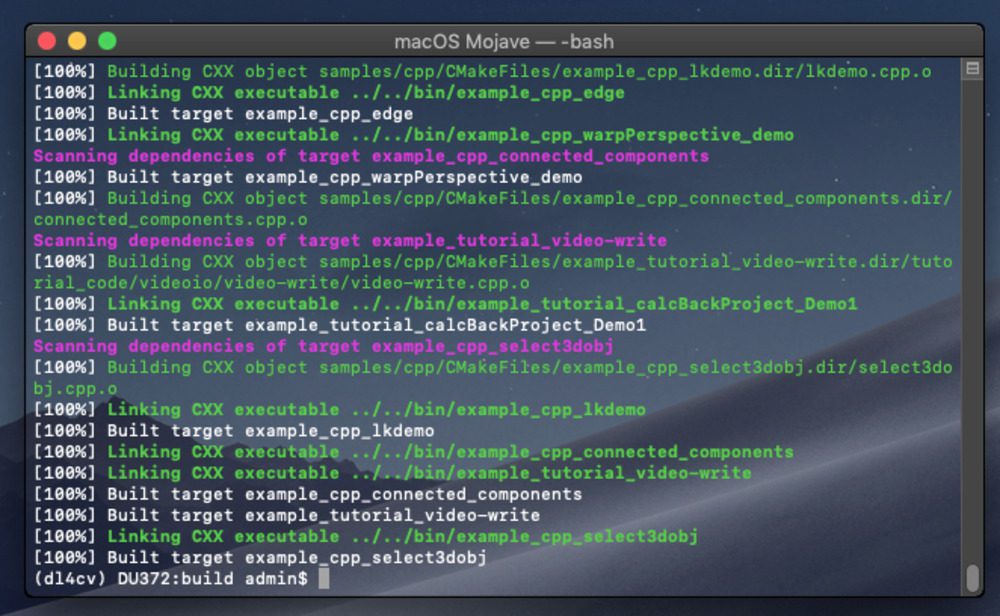
Figure 9: OpenCV compilation is complete on macOS Mojave.
From there you can install OpenCV:
$ sudo make install
After installing it is necessary to sym-link the
cv2.sofile into the
dl4cvvirtual environment.
What we need to do is create a link from where OpenCV was installed into the virtual environment itself. This is known as a symbolic link.
Let’s go ahead and take care of that now, first by grabbing the name of the
.sofile:
$ cd /usr/local/python/cv2/python-3.6
$ ls
cv2.cpython-36m-darwin.so
And now let’s rename the
.sofile:
$ sudo mv cv2.cpython-36m-darwin.so cv2.opencv3.4.4.so
$ cd ~/.virtualenvs/dl4cv/lib/python3.6/site-packages
$ ln -s /usr/local/python/cv2/python-3.6/cv2.opencv3.4.4.so cv2.so
Note: If you have multiple OpenCV versions ever installed in your system, you can use this same naming convention and symbolic linking method.
Finally, we can test out the install:
$ cd ~
$ python
>>> import cv2
>>> cv2.__version__
'3.4.4'
If your output properly shows the version of OpenCV that you installed, then you’re ready to go on to Step #7 where we will install the Keras deep learning library.
Step #7: Install TensorFlow and Keras on macOS Mojave
Before beginning this step, ensure you have activated the
dl4cvvirtual environment. If you aren’t in the environment, simply execute:
$ workon dl4cv
Then, using
pip, install the required Python computer vision, image processing, and machine learning libraries:
$ pip install scipy pillow
$ pip install imutils h5py requests progressbar2
$ pip install scikit-learn scikit-image
Next, install matplotlib and update the rendering backend:
$ pip install matplotlib
$ mkdir ~/.matplotlib
$ touch ~/.matplotlib/matplotlibrc
$ echo "backend: TkAgg" >> ~/.matplotlib/matplotlibrc
Be sure to read this guide about Working with Matplotlib on OSX, if you’re ever having trouble with plots not showing up.
Then, install TensorFlow:
$ pip install tensorflow
Followed by Keras:
$ pip install keras
To verify that Keras is installed properly we can import it and check for errors:
$ workon dl4cv
$ python
>>> import keras
Using TensorFlow backend.
>>>
Keras should be imported with no errors, while stating that TensorFlow is being utilized as the backend.
At this point, you can familiarize yourself with the
~/.keras/keras.jsonfile:
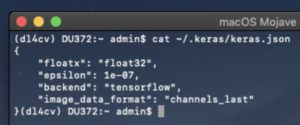
Figure 10: The Keras configuration file allows you to set the backend as well as other settings.
Ensure that the
image_data_formatis set to
channels_lastand that the
backendis set to
tensorflow.
Pre-configured environments
Congratulations! you’ve successfully configured your macOS Mojave desktop/laptop for deep learning!
You’re now ready to go. If you didn’t grab up a tea or coffee during the installation process, now is the time. It’s also the time to find a comfortable spot to read Deep Learning for Computer Vision with Python.
Did you have any trouble configuring your Mojave deep learning system?
If you struggled along the way, I encourage you to re-read the instructions and attempt to debug. If you’re still struggling, you can reach out in the DL4CV companion website issue tracker (there’s a registration link in the front of your book) or by contacting me.
I also want to take the opportunity to inform you about the pre-configured instances that come along with your book:
- The DL4CV VirtualBox VM is pre-configured and ready to go with Ubuntu 18.04 and all other necessary deep learning packages/libraries. This VM is able to run in isolation on top of your macOS operating system inside of a tool called VirtualBox. It will help you through nearly all experiments in the Starter and Practitioner bundles. For the ImageNet bundle, a GPU is a necessity and this VM does not support GPUs.
- My DL4CV Amazon Machine Image for the AWS cloud is freely open to the internet — no purchase required (other than AWS charges, of course). Getting started with a GPU in the cloud only takes about 4-6 minutes. For less than the price of a cup of coffee, you can use a GPU instance for an hour or two which is just enough time to complete some (definitely not all) of the more advanced lessons in DL4CV. The following environments are pre-configured:
dl4cv
,mxnet
,tfod_api
,mask_rcnn
, andretinanet
.
Azure users should consider the Azure DSVM. You can read my review of the Microsoft Azure DSVM here. All code from one of the first releases of DL4CV in 2017 was tested using Microsoft’s DSVM. Additional configuration is required for the DSVM to support the Bonus Bundle chapters of DL4CV, but other than that you won’t find yourself installing very many tools. If Azure is your preferred cloud provider, I encourage you to stick with Azure take advantage of what the DSVM has to offer.
Ready to get your start in deep learning? Grab your free sample chapters to my deep learning book.

Regardless of whether or not you choose to work through my deep learning book, I sincerely hope that this tutorial helped on your journey.
But if are interested in mastering deep learning for computer vision, look no further than Deep Learning for Computer Vision with Python.
Francois Chollet, AI researcher at Google and creator of Keras, had this to say about my deep learning book:
This book is a great, in-depth dive into practical deep learning for computer vision. I found it to be an approachable and enjoyable read: explanations are clear and highly detailed. You’ll find many practical tips and recommendations that are rarely included in other books or in university courses. I highly recommend it, both to practitioners and beginners. — Francois Chollet
And Adam Geitgey, the author of the popular Machine Learning is Fun! blog series, said this:
I highly recommend grabbing a copy of Deep Learning for Computer Vision with Python. It goes into a lot of detail and has tons of detailed examples. It’s the only book I’ve seen so far that covers both how things work and how to actually use them in the real world to solve difficult problems. Check it out! — Adam Geitgey
If you’re interested in studying deep learning applied to computer vision, this is the perfect book for you.
Inside my book you will:
- Study the foundations of machine learning and deep learning in an accessible manner that balances both theory and implementation
- Learn advanced deep learning techniques, including multi-GPU training, transfer learning, object detection (Faster R-CNNs, SSDs, RetinaNet), segmentation (Mask R-CNNs), and Generative Adversarial Networks (GANs), just to name a handful.
- Replicate the results of state-of-the-art papers, including ResNet, SqueezeNet, VGGNet, and others on the 1.2 million ImageNet dataset.
You’ll also learn through the best possible balance of both theory and hands-on implementation. For each theoretical deep learning concept, you’ll find an associated Python implementation to help you solidify the knowledge.
Not to mention, you’ll also have access to my installation guides and pre-configured environments!
You really can’t go wrong with any of the bundles and I allow for upgrades at any time. Feel free to purchase a lower tier bundle and when you’re ready to upgrade just send me an email and I will get you the upgrade link.
So why put it off any longer?
You can learn deep learning and computer vision — and you can embark on your journey today.
I’ll be with you every step of the way.
Summary
In today’s post, we configured our macOS Mojave box for computer vision and deep learning. The main pieces of software included Python 3.6, OpenCV, TensorFlow, and Keras accompanied by dependencies and installation/compilation tools.
Python 3.7 is not yet officialy supported by TensorFlow so you should avoid it at all costs (for the time being).
Instead, we learned how to downgrade from Python 3.7 to Python 3.6 on macOS Mojave and put all of the software into a Python 3.6 virtual environment named
dl4cv.
If you would like to put your newly configured macOS deep learning environment to good use, I would highly suggest you take a look at my new book, Deep Learning for Computer Vision with Python.
Regardless if you’re new to deep learning or already a seasoned practitioner, the book has content to help you reach deep learning mastery — take a look here.
To be notified when future blog posts are published here on PyImageSearch (and grab my 17-page Deep Learning and Computer Vision Resource Guide PDF), just enter your email address in the form below!
The post macOS Mojave: Install TensorFlow and Keras for Deep Learning appeared first on PyImageSearch.