Today’s blog post is a “bonus tutorial” in our most recent series on building a complete, end-to-end deep learning application:
- Part 1: How to (quickly) build a deep learning image dataset
- Part 2: Keras and Convolutional Neural Networks
- Part 3: Running Keras models on iOS with CoreML
In this series we have been fulfilling a childhood dream of mine: to build a Pokedex.
A Pokedex is a fictional device from the world of Pokemon (I was/still am a huge Pokemon nerd) and allows the end user to:
- Point it at a Pokemon (animal-like creatures), presumably using some sort of camera
- And automatically identify the Pokemon, providing detailed information on the creature
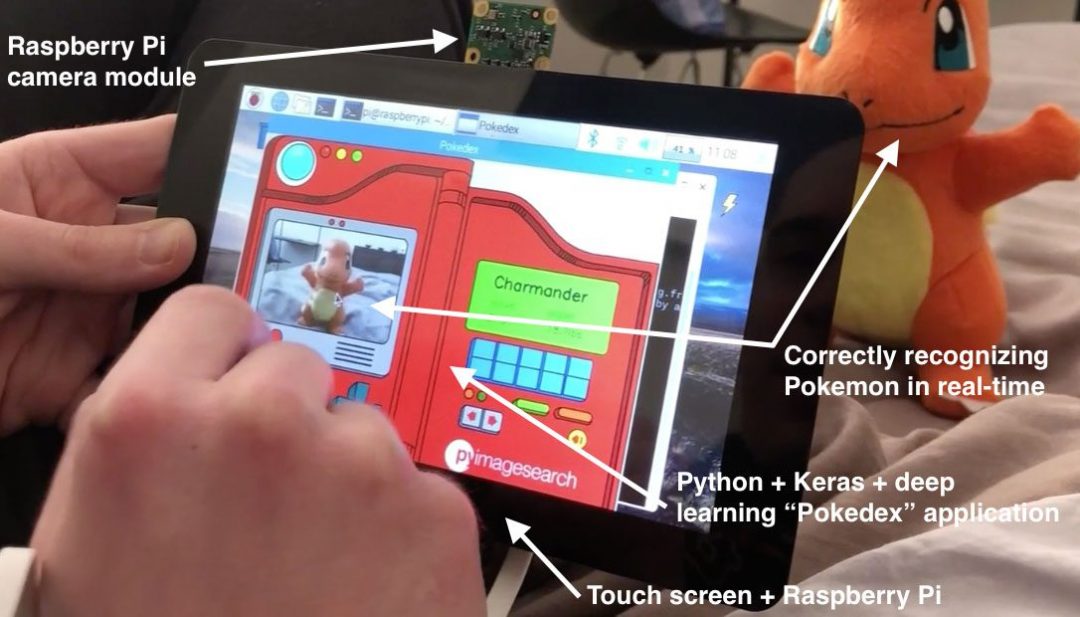
You can therefore think of a Pokedex as a smart phone application that (1) accesses your camera and (2) recognizes animals/creatures in real-time.
In order to identify Pokemon we trained a Convolutional Neural Network using Keras — this model is capable of correctly identifying Pokemon in images and video streams.
The model was then deployed to a mobile app using Keras, CoreML, and iOS to create an actual “Pokedex app”.
But why stop there?
Long-time readers of the PyImageSearch blog know that I love the Raspberry Pi…
…and I couldn’t help myself from building an actual Pokedex device using a:
- Raspberry Pi
- Camera module
- 7″ touch screen
This series has certainly been a fun, nostalgic project — thank you for taking this journey with me.
To learn more about this fun deep learning project, and run deep learning models in real-time on the Raspberry Pi, just keep reading!
Looking for the source code to this post?
Jump right to the downloads section.
A fun, hands-on deep learning project for beginners, students, and hobbyists
In today’s blog post you are going to learn how to build a complete end-to-end deep learning project on the Raspberry Pi.
This project is excellent for beginners, students, and hobbyists interested in applying deep learning to their own applications.
We’ll start off today by reviewing the hardware I used to build this project.
All of this hardware is optional, including the Raspberry Pi itself (you could run this code on your laptop/desktop provided you have a built-in webcam or USB camera). Feel free to use all or none of the hardware detailed today.
From there we’ll review the directory structure for our project.
We’ll then implement our real-time deep learning application on the Raspberry Pi using Python and Keras.
The model we’ll be using here today has already been trained. To learn how we trained our Keras model, please refer to this blog post.
Finally, we’ll deploy our real-time deep learning application to the Raspberry Pi. I have provided a number of video and GIF animations showcasing our Raspberry Pi + deep learning application.
Raspberry Pi hardware and components
To build our Pokedex deep learning application I am using the following components:
- Raspberry Pi 3
- Raspberry Pi camera module
- Pi Foundation 7″ touchscreen display
- Portable Charger RAVPower 22000mAh Power Bank
Again, all of these components, including the Raspberry Pi, are totally optional. You could easily run this program with your laptop and webcam.
I simply decided to use the Raspberry Pi as I like the hardware and enjoy working with it.
To get started, you’ll want to lay out both your Raspberry Pi and touch screen:
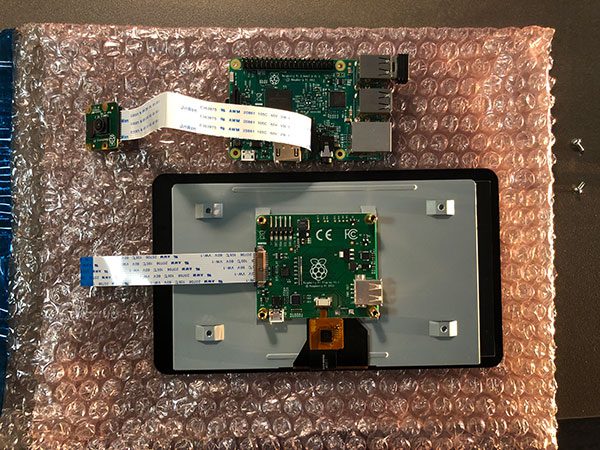
Figure 1: My Raspberry Pi + PiCamera (top) module and a 7″ touchscreen (bottom) laid out before assembly.
On the top I have my Raspberry Pi and on the bottom is the touchscreen.
Notice how I already have the camera module attached to the Raspberry Pi.
The Raspberry Pi screws on top of the touchscreen adapter board:
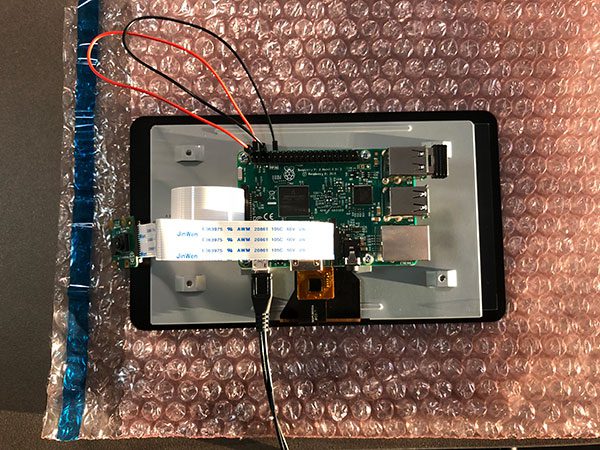
Figure 2: I’ve attached a Raspberry Pi 3 to a Pi-compatible 7″ touchscreen for my deep learning project.
I was incredibly impressed with the Pi Foundation touchscreen. Assembling it was a breeze and it worked perfectly without any special driver updates or installs.
From there I used a strip of electrical tape to attach the Raspberry Pi camera module to the back of the touch screen:
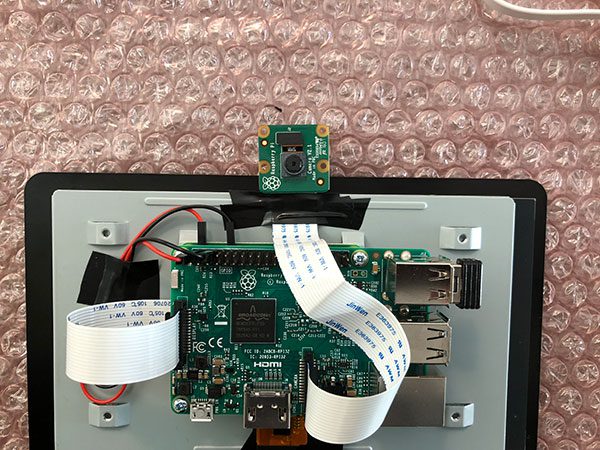
Figure 3: A deep learning Raspberry Pi project can be made with a Raspberry Pi 3, PiCamera module, and 7″ touchscreen. Shown are the Pi and PiCamera attached to the back of the touchscreen.
Notice that the camera is facing towards us in this orientation (Figure 3). This is the opposite orientation of a webcam — we’re not using our camera to take selfies. Instead, our camera will be used to capture images of Pokemon that are in front of us.
I then attached the power supply and booted up the Pi. Here you can see me launching the
pokedex.pyscript (which we’ll create later in this guide):
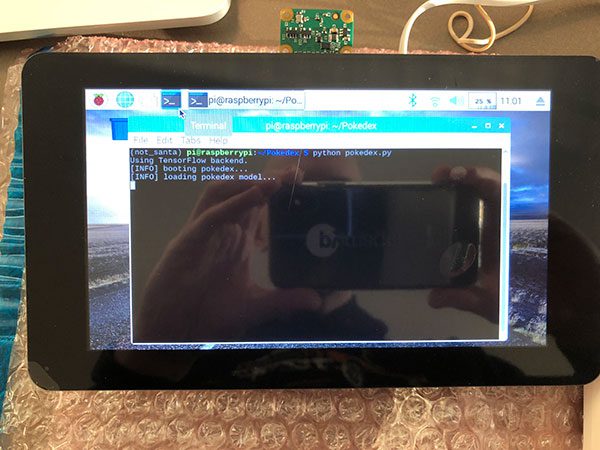
Figure 4: My deep learning computer vision project with the Raspberry Pi is ready to go. Here you can see I’m launching the application from the terminal.
Again, notice that the camera is facing away from us while the screen is facing towards us in this orientation (Figure 4). Don’t make the mistake of attaching the camera to face you (as I did…twice).
Once the script is up and running you will see the Pokedex user interface:
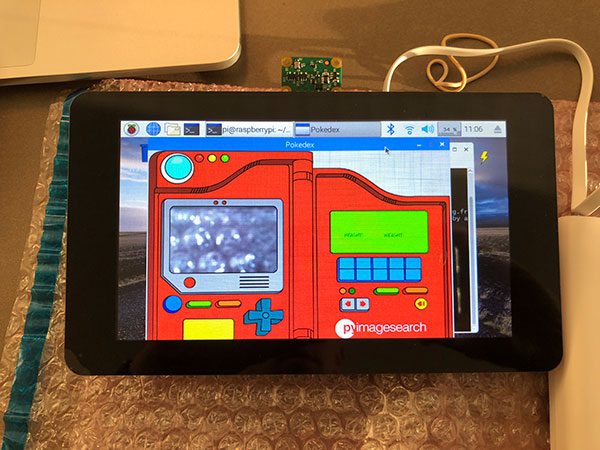
Figure 5: This week’s Raspberry Pi deep learning project is a Pokemon Pokedex — as you can see, the application is loaded and we’re ready to catch them all!
To learn how to configure your system, and build the actual Pokedex itself, refer to the rest of the tutorial.
Configuring your Raspberry Pi for deep learning

Figure 6: We’re going to use Keras with the TensorFlow backend to implement the Raspberry Pi deep learning project (a Pokedex that can identify five common Pokemon species at the touch of a finger).
In this post we will be running a Keras deep learning model on the Raspberry Pi using the TensorFlow backend.
Unfortunately, installing TensorFlow on the Raspberry Pi isn’t as easy as
pip install tensorflow.
The gist is that you’ll need to:
- Utilize Python 2.7 instead of Python 3 (which is a bit of a bummer but acceptable since this is one-off project)
- Download a special TensorFlow wheel (
.whl
) file that has been prepared for the Raspberry Pi (I’ve included this file in the “Downloads” section of this blog post) - Install the required TensorFlow + Keras system dependencies (such as HDF5)
- Install the required Python dependencies
- And finally install TensorFlow via the special
.whl
file
The process is fairly straightforward, but is too lengthy to include in this blog post.
If you would like to install Keras and TensorFlow on your Raspberry Pi please refer to the “How do I install TensorFlow and Keras on the Raspberry Pi?” section of this blog post.
As far as your OpenCV install goes, I suggest you follow this tutorial to ensure you install a NEON + VPF3 optimized OpenCV.
You will also need my imutils package, which you can install via pip:
$ pip install --upgrade imutils
In the remainder of this post I will make the assumption that either (1) you have properly configured your Raspberry Pi for Keras + TensorFlow, or (2) you are not using the Raspberry Pi and your system is properly configured.
Training our deep learning model
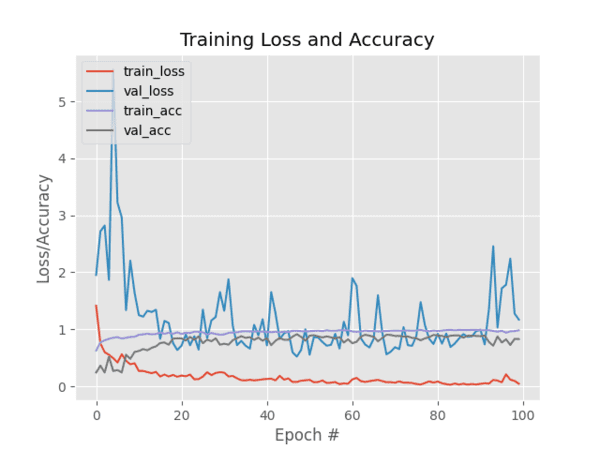
Figure 7: Training and validation loss/accuracy plot for a Pokedex deep learning classifier trained with Keras.
The Convolutional Neural Network we are using for image classification in this post has already been trained on a dataset of Pokemon (5 classes over 1,191 images).
We were able to obtain 96.84% classification accuracy on our training set and 97.07% accuracy on the testing set.
I have included the trained model in the “Downloads” section of this blog post.
To learn how to train the model, be sure to visit the previous tutorial.
Deep learning project structure
Before we get started coding up our real-time deep learning application on the Raspberry Pi, let’s first examine the project and directory structure:
├── assets
│   ├── lb.pickle
│   ├── pokedex.model
│   ├── pokedex_bg.png
│   ├── pokedex_mask.png
│   └── pokemon_db.json
└── pokedex.py
In the project directory, there is a folder named
assetsand a Python script named
pokedex.py.
The
pokedex.pyfile is our application/driver script which will:
- Load the model
- Kick off the GUI and deep learning inference process
Residing in the
assetsdirectory, the
lb.picklefile (an instance of scikit-learn’s
LabelBinarizerclass) contains our class labels. This file was generated in our previous post on Keras + Convolutional Neural Networks.
Let’s go ahead and deserialize this file and examine the class labels with Python 3 and
pickle, the Python version our model was trained on. We’ll need to manually copy and paste these labels into our
pokdex.pyfile to avoid any Python 2.7 vs. Python 3 serialization issues:
$ python
>>> import pickle
>>> lb = pickle.loads(open("assets/lb.pickle", "rb").read())
>>> class_labels = lb.classes_.tolist()
>>> class_labels
['bulbasaur', 'charmander', 'mewtwo', 'pikachu', 'squirtle']
You can leave your terminal open or refer back to this block so you can copy/paste the class labels into our next script.
Let’s examine the remaining files in the
assetsdirectory.
The
pokedex.modelfile is our trained Keras image classifier — our
pokedex.pyscript will load our Keras clssifier from disk and apply it to input images/frames.
The
pokemon_db.jsonfile is a simple JSON file containing the height and weight of each of the Pokemon which our Keras model was trained to recognize:
{
	"charmander": {
		"height": "2' 0\"",
		"weight": "18.7lbs"
	},
	"bulbasaur": {
		"height": "2' 4\"",
		"weight": "15.2lbs"
	},
	"squirtle": {
		"height": "1' 8\"",
		"weight": "19.8lbs"
	},
	"pikachu": {
		"height": "1' 4\"",
		"weight": "13.2lbs"
	},
	"mewtwo": {
		"height": "6' 7\"",
		"weight": "269lbs"
	}
}
Our
pokedex.pyscript will load this database from disk during initialization and then display the appropriate height and weight for each Pokemon when classified.
You can think of the
pokemon_db.jsonfile was the “encyclopedia” portion of the project. You can add more information to the encyclopedia, remove details, or swap out the JSON file for a sqlite implementation — the choice is up to you, have fun with it!
Finally, we have two images, the first of which is
pokedex_bg.png:
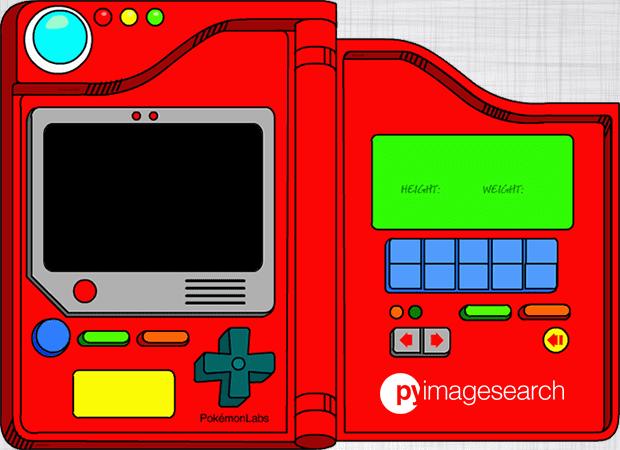
Figure 8: The Pokedex background image for our deep learning project. Credit goes to Game Trader USA.
This image (found on Game Trader USA‘s site) is the “user interface” to our deep learning application.
The black screen-like region on the left will show the real-time video feed from the Raspberry Pi.
On the right, in the green area, relevant information on the Pokemon including species, height, and width will be displayed upon classification.
We then have
pokedex_mask.png:

Figure 9: The mask allows us to place images overlaid on the background GUI image. Masking is a topic covered in Chapter 6 of my very first book, Practical Python and OpenCV + Case Studies.
This mask is a binary image and contains only two pixel values: 0 (black) and 255 (white).
When creating our user interface, we’ll mask our input video stream to ensure it fits nicely into the
pokedex_bg.png(complete with the rounded corners!).
Implementing real-time deep learning on the Raspberry Pi
Now that we have reviewed our project structure, let’s go ahead and get started.
Open up
pokedex.pyand insert the following code:
# import the necessary packages
from keras.preprocessing.image import img_to_array
from keras.models import load_model
from imutils.video import VideoStream
import numpy as np
import imutils
import json
import time
import cv2
import os
Lines 2-10 handle importing packages for this project.
Notably, we’ll be using Keras’
load_modelto load our pre-trained deep learning model (upon which we’ll make predictions). We’ll be utilizing
VideoStreamfrom my very own imutils package to handle our live video stream.
Each of the requirements are installable via pip except for OpenCV and TensorFlow (a backend for Keras). Refer to “Configuring your Raspberry Pi for deep learning” section above for any package installs.
Moving on, let’s review our
CONFIGdictionary:
# define the configuration dictionary
CONFIG = {
	# define the paths to the CNN
	"model_path": os.path.sep.join(["assets", "pokedex.model"]),

	# define the set of class labels (these were derived from the
	# label binarizer from the previous post)
	"labels": ["bulbasaur", "charmander", "mewtwo", "pikachu",
		"squirtle"],
Here we’ve defined a configuration dictionary.
Our first key,
"model_path", contains the path to our input deep learning model. Today we’re using the
pokedex.model(trained two weeks ago) which resides in the assets directory.
Next,
"labels"is our set of class labels which our Keras deep learning model was trained to recognize in our previous post.
I actually pasted these values from the terminal Python interpreter shown above for readability and compatibility (rather than loading the pickle file and inserting into the dictionary programmatically).
How come?
Python 2.7 and Python 3 handle pickle files differently (try to deserialize a Python 3 pickle file in a Python 2.7 environment and you’ll see).
To overcome this Python 2.7 and and Python 3 issue, I simply hardcoded the dictionary in the script. An alternative would be loading a text or JSON file of class labels as well.
Let’s check out the rest of the
CONFIGdictionary:
# define the path to the JSON database of Pokemon info
	"db_path": os.path.sep.join(["assets", "pokemon_db.json"]),

	# define the number of seconds to display the Pokemon information
	# for after a classification
	"display_for": 24 * 10,

	# define the paths to the Pokedex background and mask images,
	# respectively
	"pdx_bg": os.path.sep.join(["assets", "pokedex_bg.png"]),
	"pdx_mask": os.path.sep.join(["assets", "pokedex_mask.png"]),
In this block, we’ve have four more keys + values:
"db_path"
: The path to the Pokemon JSON database which contains information we’ll be displaying about the little critters."display_for"
: The number of frames our Pokemon information will be displayed for upon successful classification. I’ve set this value to 240 frames."pdx_bg"
: Our Pokedex background GUI image path."pdx_mask"
: The GUI’s associated mask image path.
The remaining keys + values in our configuration dictionary are a selection of image coordinates and the text color:
# (x, y)-coordinates of where the video stream location lives
	"pdx_vid_x": 25,
	"pdx_vid_y": 125,

	# (x, y)-coordinates of where the Pokemon's name, height, and
	# weight will be drawn
	"pdx_name_x": 400,
	"pdx_name_y": 167,
	"pdx_height_x": 400,
	"pdx_height_y": 213,
	"pdx_weight_x": 485,
	"pdx_weight_y": 213,

	# color of all text drawn on the Pokedex
	"pdx_color": (33, 33, 42)[::-1]
}
To determine the exact (x, y)-coordinates of where the video stream for the user interface should be displayed, I opened up
pokedex_bg.pngin Photoshop and examined the coordinates.
I found that
(25, 125)is the appropriate location.
You can use whatever tool you are familiar with, I just use Photoshop regularly and am familiar with the interface.
Similarly, Lines 40-45 define the (x, y)-coordinates for where the Pokemon’s name, height, and weight information will be displayed (again, these coordinates were also determined by examining
pokedex_bg.pngin Photoshop).
The value associated with the
"pdx_color"key is the RGB tuple of the color we are going to use when drawing the Pokemon name, height, and weight on the user interface. We define this color as RGB tuple and then reverse it since OpenCV expects colors to be passed in using BGR ordering.
Going forward, be sure to refer to the
CONFIGdictionary as needed.
Next, I’ll initialize some important variables and explain what each represents:
# initialize the current frame from the video stream, a boolean used
# to indicated if the screen was clicked, a frame counter, and the
# predicted class label
frame = None
clicked = False
counter = 0
predLabel = None
The first variable,
frame, is the current frame captured from the video stream.
Following is
clicked— a boolean indicating if the screen was tapped (it is a touch screen after all, but your mouse will also work). In a previous PyImageSearch tutorial, I demonstrated how to capture mouse click events with OpenCV — we’ll be using a similar method here. When a user clicks/taps in our application we’ll classify the input frame and display the results for a set amount of time (240 frames in my case).
The
countervariable holds a count of the number of frames a Pokemon’s information has been displayed for after a classification. We’ll be comparing the value to
CONFIG["display_for"]to determine if we are finished displaying a result.
The predicted class label (Pokemon species) will be held in
predLabel— it is initialized to
Nonefor now.
To handle the clicking/tapping on the user interface, OpenCV requires us to define a callback function. Our
on_clickcallback method is defined below:
def on_click(event, x, y, flags, param):
	# grab a reference to the global variables
	global frame, clicked, predLabel

	# check to see if the left mouse button was clicked, and if so,
	# perform the classification on the current frame
	if event == cv2.EVENT_LBUTTONDOWN:
		predLabel = classify(preprocess(frame))
		clicked = True
The
on_clickcallback function is executed each time a click is captured by the GUI. We’re only concerned with the click event parameter; however, OpenCV provides additional information such as the (x, y)-coordinates, flags, and param.
When our callback function encounters a left mouse click or a finger tap (
event == cv2.EVENT_LBUTTONDOWN), we
preprocessand
classifyour
frame, storing the result as
predLabeland marking
clickedas
True. As denoted by Line 61,
frame,
clicked, and
predLabelare global variables.
The
preprocesssteps must be identical to the steps taken when training our model (you can learn how we trained our Keras deep learning model in an earlier post in the series).
Below you can find the
preprocessmethod:
def preprocess(image):
	# preprocess the image
	image = cv2.resize(image, (96, 96))
	image = image.astype("float") / 255.0
	image = img_to_array(image)
	image = np.expand_dims(image, axis=0)

	# return the pre-processed image
	return image
In this method, our first step is to
resizethe frame/
imageto
(96, 96)pixels. Since our model is designed for these dimensions, we must use the same dimensions.
Next, we scale the image pixel array values to the range of
[0, 1].
Subsequently, we call
img_to_arrayon the image which orders the channels of the array properly, based on “channels first” or “channels last” ordering.
We train/classify images in batches. After calling
np.expand_dimson the image, it will have the shape
(1, 96, 96, 3). Forgetting to add in this extra dimension will result in an error when calling our
predictmethod of the model in the
classifyfunction.
Lastly, we return the
imageto the calling function.
Note: Do the the preprocessing steps of the preprocess
function look foreign to you? Preprocessing is essential to all deep learning workflows. I cover preprocessing in depth inside of Deep Learning for Computer Vision with Python (along with many more topics that will take you from beginner to seasoned expert throughout the course of the book bundles). Be sure to check out the free sample chapters available here.
Our final helper function,
classify, accepts an input
image(making the assumption that it has already been pre-processed) and then classifies it:
def classify(image):
	# classify the input image
	proba = model.predict(image)[0]

	# return the class label with the largest predicted probability
	return CONFIG["labels"][np.argmax(proba)]
Our classify function is very direct and to the point, but this is actually where all the magic happens under the hood.
Calling
model.predicton the image and grabbing the zero-index result (the results for the first and only image in the batch) returns a list of each of probabilities from the softmax layer in our network (Line 81).
Taking the index of the maximum probability and feeding it into our labels list (in
CONFIG) yields the human readable class label (Line 84). We then return this label to the calling function.
Now that our helper functions are defined we can move on to creating the user interface:
# load the pokedex background image and grab its dimensions
print("[INFO] booting pokedex...")
pokedexBG = cv2.imread(CONFIG["pdx_bg"])
(bgH, bgW) = pokedexBG.shape[:2]

# load the pokedex mask (i.e., the part where the video will go and)
# binarize the image
pokedexMask = cv2.imread(CONFIG["pdx_mask"])
pokedexMask = cv2.cvtColor(pokedexMask, cv2.COLOR_BGR2GRAY)
pokedexMask = cv2.threshold(pokedexMask, 128, 255,
	cv2.THRESH_BINARY)[1]
We first load our user interface image from disk and extract the height and width (Lines 88 and 89).
From there we load the mask image from disk (Line 94) and convert it to a single channel grayscale image (Line 95).
We then apply a binary threshold (Lines 96 and 97). After thresholding, the image will only contain 0’s and 255’s (0 for black background and 255 for white foreground).
Moving on, let’s load data, initialize objects, and setup our callback function:
# load the trained convolutional neural network and pokemon database
print("[INFO] loading pokedex model...")
model = load_model(CONFIG["model_path"])
db = json.loads(open(CONFIG["db_path"]).read())

# initialize the video stream and allow the camera sensor to warm up
print("[INFO] starting video stream...")
# vs = VideoStream(src=0).start()
vs = VideoStream(usePiCamera=True).start()
time.sleep(2.0)

# setup the mouse callback function
cv2.namedWindow("Pokedex")
cv2.setMouseCallback("Pokedex", on_click)
We load the Pokedex CNN model on Line 100 and the Pokemon database on Line 101.
Then, we initiate our
VideoStreamobject. I’m using the PiCamera as is shown on Line 106. If you’re running the app on your laptop/desktop, you can comment this line out (Line 106) and uncomment Line 105.
We pause for
2.0seconds to allow for the camera to warm up (Line 107).
From there, we need to setup the mouse callback listener function. In order to do accomplish this, we first need a
namedWindow. I named the window
"Pokedex"on Line 110 and then established the mouse callback on Line 111.
Let’s begin processing frames in a
whileloop:
# loop over the frames from the video stream
while True:
	# if the window was clicked "freeze" the frame and increment
	# the total number of frames the stream has been frozen for
	if clicked and count < CONFIG["display_for"]:
		count += 1

	else:
		# grab the frame from the threaded video stream and resize
		# it to have a maximum width of 260 pixels
		frame = vs.read()
		frame = imutils.resize(frame, width=260)
		(fgH, fgW) = frame.shape[:2]

		# reset our frozen count, clicked flag, and predicted class
		# label
		count = 0
		clicked = False
		predLabel = None
Inside of the
while Trueloop, we first check to see if we are currently displaying a classification (Lines 117-118) and if so, increment the
countvariable. In other words, if this if statement is triggered, the frame won’t change up until the number of
CONFIG["display_for"]frames.
Otherwise, let’s grab a new
framefrom the video stream process it. First we resize it and extract the dimensions (Lines 124 and 125). We also reset
count,
clicked, and
predLabel(Lines 129-131).
Going back to the main execution flow of the loop, we create the actual user interface from the frame:
# create the pokedex image by first allocating an empty array
	# with the same dimensions of the background and then applying
	# array slicing to insert the frame
	pokedex = np.zeros((bgH, bgW, 3), dtype="uint8")
	pokedex[CONFIG["pdx_vid_y"]:CONFIG["pdx_vid_y"] + fgH,
		CONFIG["pdx_vid_x"]:CONFIG["pdx_vid_x"] + fgW] = frame

	# take the bitwise AND with the mask to create the rounded
	# corners on the frame + remove any content that falls outside
	# the viewport of the video display, then take the bitwise OR
	# to add the frame to add image
	pokedex = cv2.bitwise_and(pokedex, pokedex, mask=pokedexMask)
	pokedex = cv2.bitwise_or(pokedex, pokedexBG)
First, we allocate a
pokedexarray with same dimensions as the background image (Line 136).
Then, we store the
framein the
pokedexarray using the coordinates specified from our configuration dictionary on Lines 137 and 138. Essentially, this puts the frame where the white box resides in Figure 9.
We now have a masking trick to perform. The goal of the next two lines is to achieve rounded corners like the white box in Figure 9.
To accomplish the rounding of corners, we first compute the
bitwise_andbetween the
pokedeximage and the
pokedexMask(Line 144). This produces round corners and removes any frame content that falls outside the viewport of the mask.
Then, the
bitwise_oris taken to combine both the
pokedexand
pokedexBGto form the final user interface image (Line 145). This
bitwise_oronly works because the
pokedexBGhas a value of 0 (black) for the screen viewport region.
Note: To learn more about masking, as well as other image processing fundamentals, refer to Practical Python and OpenCV + Case Studies and/or the PyImageSearch Gurus course.
If a classification has just taken place, we need to draw the Pokemon name, height, and weight on the UI:
# if the predicted class label is not None, then draw the Pokemon
	# stats on the Pokedex
	if predLabel is not None:
		# draw the name of the Pokemon
		pokedex = cv2.putText(pokedex, predLabel.capitalize(),
			(CONFIG["pdx_name_x"], CONFIG["pdx_name_y"]),
			cv2.FONT_HERSHEY_SIMPLEX, 0.7, CONFIG["pdx_color"], 2)

		# draw the Pokemon's height
		pokedex = cv2.putText(pokedex, db[predLabel]["height"],
			(CONFIG["pdx_height_x"], CONFIG["pdx_height_y"]),
			cv2.FONT_HERSHEY_SIMPLEX, 0.45, CONFIG["pdx_color"], 1)

		# draw the Pokemon's weight
		pokedex = cv2.putText(pokedex, db[predLabel]["weight"],
			(CONFIG["pdx_weight_x"], CONFIG["pdx_weight_y"]),
			cv2.FONT_HERSHEY_SIMPLEX, 0.45, CONFIG["pdx_color"], 1)
So long as the
predLabelis populated with a class label, we’re going to draw the class label text and lookup other relevant information in our Pokemon database JSON file to display.
Lines 151-153 handle drawing the Pokemon species text (also known as the CNN class label).
Similarly Lines 156-158 and Lines 161-163 handle drawing the Pokemon’s height and width respectively.
Let’s show the output frame and perform cleanup:
# show the output frame
	cv2.imshow("Pokedex", pokedex)
	key = cv2.waitKey(1) & 0xFF

	# if the `q` key was pressed, break from the loop
	if key == ord("q"):
		break

# do a bit of cleanup
print("[INFO] shutting down pokedex...")
cv2.destroyAllWindows()
vs.stop()
On Line 166 we display the result of our hard work in the
"Pokedex"named window.
We grab keypresses (Line 167) and if the
"q"key has been pressed, we
breakout of the loop (Lines 170 and 171).
Upon exiting the while loop, we perform cleanup (Lines 175 and 176) and exit the script.
Real-time deep learning results
We are now ready to see our real-time deep learning application on the Raspberry Pi in action!
Make sure you use the “Downloads” section of this blog post to download the source code.
From there, open up a shell and execute the following command:
$ python pokedex.py
Using TensorFlow backend.
[INFO] booting pokedex...
[INFO] loading pokedex model...
[INFO] starting video stream...
[INFO] shutting down pokedex...
If you’re using a Raspberry Pi to run this code it may take 20-30 seconds to initialize TensorFlow and import the Keras model itself.
Be patient!
Once the model is loaded into memory you’ll be able to perform deep learning image classification in real-time.
A full demo of the Pokedex + real-time deep learning model in action can be found below:
I also created a simple Python script (that ran in the background) to take a screenshot every two seconds — I pieced the screenshots together to form an animated GIF of classifying Charmander:

Figure 10: Our deep learning Pokedex project correctly recognizes Charmander.
In my Pokemon collection, I have a 3D printed Bulbasaur that I decided to classify as well:
Figure 11: Our Keras CNN is capable of recognizing a 3D printed Bulbasuar!
Summary
In today’s post we:
- Learned how to perform real-time deep learning on the Raspberry Pi
- Implemented a fun, hands-on deep learning project
All of the hardware and components, including the Raspberry Pi itself, are totally optional. You can just as easily execute this code on your laptop or desktop provided you have either a built-in webcam or USB camera.
I chose to use the Raspberry Pi for this project as:
- I receive a number of questions from readers asking if real-time deep learning is possible on the Raspberry Pi (it is, provided your model is simplistic enough).
- I wanted to build an actual device rather than just an application.
One of my favorite aspects of running PyImageSearch is being able to use my imagination, incorporate a bit of nostalgia, and build actual fictional applications and devices from my childhood.
These devices, such as the Pokedex, were once thought make believe — but by using deep learning, we’ve made them a reality.
I hope you enjoyed this series of blog posts and thank you for taking this journey with me.
But before you go, make sure you enter your email address in the form below to join the PyImageSearch newsletter. I’ll send you a quick email each week new posts are published here on PyImageSearch.
Downloads:
The post A fun, hands-on deep learning project for beginners, students, and hobbyists appeared first on PyImageSearch.